<?xml version="1.0" encoding="UTF-8" standalone="yes"?>
<feed xmlns="http://www.w3.org/2005/Atom">
  <title>ezri's blog</title>
  <id>https://ezrizhu.com/blog.atom</id>
  <updated>2026-05-09T22:31:57.592396964+00:00</updated>
  <author>
    <name>ezri zhu</name>
    <email>me@ezrizhu.com</email>
  </author>
  <link href="https://ezrizhu.com/blog.atom" rel="self" />
  <link href="https://ezrizhu.com/blog" rel="alternate" />
  <generator>https://github.com/ezrizhu/www</generator>
  <entry>
    <title>Recurse Center Return Statement</title>
    <id>https://ezrizhu.com/blog/rc-return-statement</id>
    <published>2025-09-12T00:00:00+08:00</published>
    <updated>2025-09-12T00:00:00+08:00</updated>
    <content type="html" xml:base="https://ezrizhu.com/blog/rc-return-statement"><![CDATA[<h2>What’s the Recurse Center?</h2>
<blockquote>
<p>The <a href="https://recurse.com" target="_blank">Recurse Center</a> is a community of smart, nice,
thoughtful programmers of all experience levels, that you can join by applying
to do a six-, or 12-week self-directed retreat in NYC. People spend their time
at RC working on personal projects, exploring new areas of programming,
contributing to open source software, or anything else they’re interested in.</p>
</blockquote>
<p>RC focuses on <a href="https://www.recurse.com/manual#sub-sec-self-directives" target="_blank">three
self-directives</a>,</p>
<ul>
<li>Work at the edge of your abilities</li>
<li>Build your volitional muscles</li>
<li>Learn generously</li>
</ul>
<p>Along with <a href="https://www.recurse.com/social-rules" target="_blank">four social rules</a></p>
<ul>
<li>No well-actually’s</li>
<li>No feigned surprise</li>
<li>No backseat driving</li>
<li>No subtle -isms</li>
</ul>
<blockquote>
<p>In addition to the retreat, RC works with over 150 partner companies to help
Recursers find programming jobs. The jobs team can help review your resume, set
you up with mock interviews, and give you advice about where you might fit in
best.</p>
</blockquote>
<h2>Why did I join RC?</h2>
<p>I joined RC for the Summer 1 2025 batch to spend my summer break. I’d known
about the Recurse Center for a few years from reading various people’s
blogs<a href="https://ntietz.com" target="_blank">0</a> <a href="https://filippo.io/" target="_blank">1</a> <a href="https://jvns.ca/" target="_blank">2</a> that mentioned it in their footers.</p>
<p>I wanted to attend RC because I want to be motivated by and surrounded with
other like-minded, passionate programmers. Most importantly, I wanted to be a part
of a wider community full of these like-minded, passionate people with their own
areas of experience, and nuances that I learn from.</p>
<h2>My time at RC</h2>
<p>Throughout my time at the Recurse Center, I spent most of my time talking and
pairing on projects, however I also got a few things of my own done! Below are
some of those.</p>
<ul>
<li>Package/Fix various packages on
<a href="https://github.com/NixOS/nixpkgs/pulls?q=author%3Aezrizhu" target="_blank">nixpkgs</a></li>
<li>Paired with <a href="https://www.willbicks.com/" target="_blank">Will</a> on a microcontroller that
bitbanged a HID Prox card signal to simulate a real HID Prox card. I learned so
much about how RFID technology works as well as using various tools like a
oscilloscope and a logic analyzer.</li>
<li>Started various embedded projects featuring <a href="https://ezrizhu.com/blog/esp32-rs-dev-flakes" target="_blank">nix flakes and esp32-idf with
embassy</a></li>
<li><a href="https://ezrizhu.com/blog/tmux-visual-bell" target="_blank">Custom tmux visual bell</a></li>
<li>Gotten more rigorous at programming, less handwaving things around</li>
</ul>
<p>These projects are just the tangible outputs of my growth from RC. It’s been a
few weeks since the end of my RC batch, but I am still trying to internalize how
inspired RC made me feel. I enjoyed computers so much more there. It was
refreshing to be in a space where everyone else is as passionate about computers
as me, surrounded by people who are happy to create art with computers. Coming
out of RC, one of the big takeaways I had was that you can just create things on
your own terms. It doesn’t have to make your resume better. It doesn’t have to
create value for shareholders. You can just make things for the sake of it.</p>
<p>At the Recurse Center, we had weekly internal talks where recursors can sign up
to give a 5-minute presentation. These presentations ranged from projects that
recursors have completed, to things recursors have just started and is looking
for feedback, or just a 5 minute technical rant. These presentations are a very
nice way for us to show off what we’re working on to other recursors, in a
low-stress, welcoming environment. It is an extremely good way to keep yourself
accountable when you have a presentation deadline. However if you have a project
that you’d like to take longer than 5 minutes to present, we also have in-depth
presentations that allots for more time.</p>
<p>One of my favorite, long-running RC tradition is the weekly non-programming
talks. Non-programming talks have ranged from someone’s journey to Antarctica as
a scientist, all the way to lockpicking. It is a great way for us as programmers to
gain exposure to other cool things that our world has to offer. It is also
something that even as an alum, an event that I still try to attend every week.</p>
<p>Every week, I try to go out on some outings with my batch in NYC every week,
whether it is another tech meetup like
<a href="https://toddwords.com/wordhack/" target="_blank">wordhack</a>, NYCResistor, or non-technical
outings such as getting lunch, dinner together, to visiting the Brooklyn
Botanical Garden.</p>
<p>RC also opens up its doors to the public for some events, such as
<a href="https://www.recurse.com/localhost" target="_blank">Localhost</a>. Localhost is a series of monthly
technical talks in NYC, given by members of the Recurse Center community.</p>
<p>The Lunch table at RC is a magical place, there are always people there talking
about interesting things, there are always interesting serendipitous
conversations that spawns there.</p>
<p>I’d say one of my biggest challenges coming into RC was how to manage my time.
I feel like I spend most of my time talking to people, getting nerd-sniped into
something everyday. That resulted in me not getting as much done as I’d hoped,
but I still feel very great about it as I feel like I am growing so much as a
programmer every day.</p>
<h2>End notes</h2>
<p>Coming out of my RC batch, I feel very refreshed. I spoke to so many people
coming from all stages of their career, within and outside of computer science.
I get to be surrounded by so many pleasant people in NYC every day, and attended
a lot of events outside of the Recurse Center with other Recursors. I also feel
more confident as a programmer, as well as being more willing to work on my own
projects for fun. I am very happy that I will always be surrounded by the
amazing recurse community. I still go out to local NYC events in and around NYC
with recursors.</p>
<p>Recurse felt like a very defining moment in my technology career, I have always
been driven by RC’s values of working at the edge of my abilities, learning new
things, as well as sharing what I have learned with others. Recurse taught me to
strengthen my volitional muscles, to learn to pick what I’d like to spend my
time and effort on.</p>
<p>I have also integrated the recurse social rules into how I
behave, I felt like the social rules made RC a especially friendly environment,
and I believe abiding by these rules will make me more friendly.</p>
<p>I’d be happy to tell you more about my experience at RC, or answer any questions
you have about applying :)</p>
<h2>Acknowledgements</h2>
<p>Thanks to everyone that was at my RC batch for making it one of the most
memorable summer of my college years. I had a blast and I think this experience
really defined the rest of my career. I felt very refreshed and I am happy I
chose the field of computer science and attended RC this summer. I’d also like
to thank all the RC faculty for nurturing the space and the community.</p>
<p>And to everyone at the Recurse Center, whether you’re an alum or in batch,
<strong>Never Graduate!</strong></p>
<p><img alt="picture of me and two other recursors sitting on a tree" src="/assets/img/blog/20250912-rc_return_statement.jpg">
(Picture of me and recursors at the Brooklyn Botanical Garden, we then had
amazing Italian food at Arthur Ave.)</p>
<p>&lt;3</p>]]></content>
    <link href="https://ezrizhu.com/blog/rc-return-statement" rel="alternate" />
  </entry>
  <entry>
    <title>Embedded rust development on esp32 with flakes</title>
    <id>https://ezrizhu.com/blog/esp32-rs-dev-flakes</id>
    <published>2025-06-25T00:00:00+08:00</published>
    <updated>2025-06-25T00:00:00+08:00</updated>
    <content type="html" xml:base="https://ezrizhu.com/blog/esp32-rs-dev-flakes"><![CDATA[<p>So I started doing embedded rust dev on riscv esp32. However it was a hell
getting the development environment working with nix flakes. After hours of
suffering, here it is. I consulted a <em>lot</em> of online resources, they are also
listed below.</p>
<pre><code class="language-nix">{
  description = "EMLSS dev env";
  inputs = {
    nixpkgs.url = "github:NixOS/nixpkgs/nixos-unstable";
    rust-overlay.url = "github:oxalica/rust-overlay";
    flake-utils.url = "github:numtide/flake-utils";
    nixpkgs-esp-dev.url = "github:mirrexagon/nixpkgs-esp-dev";
  };
  outputs = { self, nixpkgs, rust-overlay, flake-utils, nixpkgs-esp-dev, ... }:
    flake-utils.lib.eachDefaultSystem (system:
      let
        overlays = [
          rust-overlay.overlays.default
          nixpkgs-esp-dev.overlays.default
        ];
        pkgs = import nixpkgs {
          inherit system overlays;
        };
        rustToolchain = pkgs.rust-bin.selectLatestNightlyWith (toolchain: toolchain.default.override {
          extensions = [ "rust-src" "miri" "rustfmt" ];
          targets = ["riscv32imc-unknown-none-elf"];
        });
        espIdf = pkgs.esp-idf-full;
      in
      {
        devShells.default = pkgs.mkShell {
          LIBCLANG_PATH = "${pkgs.llvmPackages.libclang.lib}/lib";
          buildInputs = with pkgs; [
            openssl
            pkg-config
            fd
            rustToolchain
            espflash
            esp-generate
            ldproxy
            python3
            cmake
            ninja
            python311
            python3Packages.pip
            python3Packages.virtualenv
            espIdf
            probe-rs-tools
          ];
          shellHook = ''
          export ESP_IDF_TOOLS_INSTALL_DIR=fromenv
          export PATH="$IDF_PYTHON_ENV_PATH/bin:$PATH"
          '';
        };
      }
    );
}
</code></pre>
<p>Further reading</p>
<ul>
<li><a href="https://wiki.nixos.org/wiki/ESP-IDF" target="_blank">Nix Wiki: ESP-IDF</a></li>
<li><a href="https://github.com/mirrexagon/nixpkgs-esp-dev" target="_blank">nixpkgs-esp-dev</a></li>
<li><a href="https://github.com/nix-community/fenix/issues/58#issuecomment-2156056797" target="_blank">fenix issue comment on custom
toolchain</a></li>
<li><a href="https://github.com/oxalica/rust-overlay" target="_blank">rust-overlay</a></li>
<li><a href="https://github.com/hawkw/eclss/blob/main/flake.nix" target="_blank">eclss flakes</a></li>
</ul>
<p>This is a short one, I will write more posts about my embedded projects in the
future :)</p>]]></content>
    <link href="https://ezrizhu.com/blog/esp32-rs-dev-flakes" rel="alternate" />
  </entry>
  <entry>
    <title>Custom tmux visual bell</title>
    <id>https://ezrizhu.com/blog/tmux-visual-bell</id>
    <published>2025-06-08T00:00:00+08:00</published>
    <updated>2025-06-08T00:00:00+08:00</updated>
    <content type="html" xml:base="https://ezrizhu.com/blog/tmux-visual-bell"><![CDATA[<p><a href="https://en.wikipedia.org/wiki/Bell_character" target="_blank">Terminal bells</a> are a neat way
for command-line applications to ping the user about something. It’s the ‘ding’
that you hear on your terminal sometimes when you’re tabbing around or when you
run this.</p>
<pre><code>printf '\a'
</code></pre>
<p>In tmux, you can enable visual bell via the <code>bell-action</code> and the <code>visual-bell</code>
option, but it is not super pretty, we can do better than that.</p>
<p><img alt="screenshot of a tmux bar with the text Bell in current window" src="/assets/img/blog/20250608-tmux_visual_bell_bad.png"></p>
<p>So I wrote this script that has tmux bark at you whenever any window under any
session gets a bell, using tmux’s <code>display-popup</code>, it also shows you the tmux
session and window that sent the bell.</p>
<p>To use it, you can just save this script somewhere, I use home-manager’s
home.file to write it for me. I used the path <code>~/.config/tmux/bell.sh</code></p>
<pre><code>#!/bin/sh
SESSION="$1"
WINDOW="$2"
tmux display-popup -x P -y P -w 40 -h 3 -t . \
    "echo -n '🦴 awrf~ awrf~ $SESSION:$WINDOW 🦴'" &amp;
(sleep 1 &amp;&amp; tmux display-popup -C) &amp;
</code></pre>
<p>then in your tmux’s config file,</p>
<pre><code>set-option -g bell-action any
set-option -g visual-bell off
set-hook -g alert-bell "run-shell '~/.config/tmux/bell.sh \"#S\" \"#W\"'"
</code></pre>
<p><img alt="screenshot of a terminal and a popup with the bell message at the bottom left" src="/assets/img/blog/20250608-tmux_visual_bell.png"></p>
<p>This is a pretty short blog, but I think it’s pretty neat and I hope you enjoyed
it. At first I thought to make a tmux plugin but this also works.</p>]]></content>
    <link href="https://ezrizhu.com/blog/tmux-visual-bell" rel="alternate" />
  </entry>
  <entry>
    <title>Obsidian Publish Directory Enumeration</title>
    <id>https://ezrizhu.com/blog/obsidian-dir-enum</id>
    <published>2025-02-08T00:00:00+08:00</published>
    <updated>2025-02-08T00:00:00+08:00</updated>
    <content type="html" xml:base="https://ezrizhu.com/blog/obsidian-dir-enum"><![CDATA[<p>I have been using Obsidian for a while now. It is a great tool for organizing my life. My daily TODO lists, project boards, notes for school and research, and the occasional journal are all stored in Obsidian. At a certain point, I needed to share some notes with my collaborators, and that’s where <a href="https://obsidian.md/publish" target="_blank">Obsidian Publish</a> came in.</p>
<p>However, when the “show navigation” setting is off in publish options, users might assume their Obsidian pages are no longer indexable by others. This feature seems useful for sharing pages with specific individuals via direct links while preventing the general public from discovering those links. I initially thought it was a reasonable approach for sharing somewhat sensitive files, similar to unlisted videos on YouTube.</p>
<p><img alt="A screenshot of the obsidian publish options, showing various options as ‘display’" src="/assets/img/blog/20250208-obsidian_publish_options.png"></p>
<p>It appears that, similar to pages with navigation enabled, a web request to a published page still fetches a list of all published pages on that vault via <code>https://publish-01.obsidian.md/cache/id</code>, enabling a malicious user to enumerate all available pages.</p>
<p>Upon testing, it also appears that if you block the above URL, the page fails to load but a search box appears, allowing that malicious user to perform full-text search on the vault, even though the user has “show search bar” disabled.</p>
<p>This may be out of scope regarding whether Obsidian should hide these pages at the API level. However, I think it should be better documented in the Obsidian vault to prevent sensitive data leaks due to incorrect assumptions users may have about these toggles.</p>
<p>Furthermore, it appears that all UI options can be enabled client-side via JavaScript.</p>
<p>POC by <a href="https://kibty.town" target="_blank">eva</a> You can find the original page, and the page after the clientside js change.
<img alt="proof of concept clientside js change" src="/assets/img/blog/20250208-obsidian_publish_poc_code.png">
<img alt="an obsidian publish page with no navigation options, just a plain page" src="/assets/img/blog/20250208-obsidian_publish_poc_orig.png">
<img alt="an obsidian publish page with a list of all files, mindmap, and a search bar" src="/assets/img/blog/20250208-obsidian_publish_poc_result.png"></p>
<h3>Response from Obsidian</h3>
<blockquote>
<p>At this time, Publish isn’t designed to secretly share content and that it’s more aimed at publishing public content. For private sharing one can use password protection, although it is just all or nothing.
I’ll work on seeing if we can make it more apparent that just because the navigation is hidden, that the files are not any more secure.</p>
</blockquote>
<p>In my opinion, Obsidian Publish would be a stronger choice if it could disallow file enumeration. Regardless, this limitation should be clearly documented so users won’t make incorrect assumptions that could lead to potential data breaches. Currently, I am using <a href="https://github.com/Dzoukr/MoonServerObsidianPlugin" target="_blank">A Moon Server plugin</a> on an instance hosted by a friend.</p>]]></content>
    <link href="https://ezrizhu.com/blog/obsidian-dir-enum" rel="alternate" />
  </entry>
  <entry>
    <title>NixOS Public Unix Server</title>
    <id>https://ezrizhu.com/blog/pubnix</id>
    <published>2024-09-29T00:00:00+08:00</published>
    <updated>2024-09-29T00:00:00+08:00</updated>
    <content type="html" xml:base="https://ezrizhu.com/blog/pubnix"><![CDATA[<p>Sorry it’s been a while since I last wrote something, but I want to share
something I’ve been building!</p>
<p>I’ve been building a invite-only, shared, distributed NixOS system called
wolfgirl.systems.</p>
<p>Users are usually more trusted as it’s an invite only community, so they will
have access to the nix daemon to install anything they want, like home-manager.</p>
<p>We’re also requesting an ASN from ARIN and I have allocated a chunk of IPv6
space to the network, so users can spin up something like bird and experimenting
with announcing IPv6 space via our ASN, and it’d be routable from the world, as
most of our locations support BGP transit.</p>
<p>Users are also allowed to host their own websites, currently we’re just pointing
/~username to a dir in their home directory, but in the future we plan on
supporting cgi-bins and forwarding http sockets.</p>
<p>In the future, I also plan on mounting a shared disk to all the machines, so
users will have access to a shared storage space across all of our machines.</p>
<p>You can find the docs, nixos config of wolfgirl.systems
<a href="https://git.private.coffee/wolfgirls" target="_blank">here</a>.</p>
<p>But yeah, that’s all for now. Feel free to email me for an invite.</p>]]></content>
    <link href="https://ezrizhu.com/blog/pubnix" rel="alternate" />
  </entry>
  <entry>
    <title>hypervisor with cockpit-machine</title>
    <id>https://ezrizhu.com/blog/cockpit-machine</id>
    <published>2024-06-05T00:00:00+08:00</published>
    <updated>2024-06-05T00:00:00+08:00</updated>
    <content type="html" xml:base="https://ezrizhu.com/blog/cockpit-machine"><![CDATA[<p>Sometimes, all you need is to deploy virtual machines on a server. You don’t
want to care about the fancy cloudinit stuff, you don’t care about users, and
groups. You just want a hypervisor that you can spin up VMs with and acccess the
console of via the web, while keeping your system relatively “clean”.</p>
<p>In the past, I have always stuck with Proxmox, while that’s a reasonable choice
for most use cases, especially ones involving giving others access to virtual
consoles and some other server management features. It is no longer fitting for
my purposes. I have outlined the reasons on <a href="https://ezrizhu.com/blog/eve" target="_blank">this post about the EVE Virtual
Environment</a>. However, EVE is yet to be done, and
I recently had the need to deploy a new hypervisor.</p>
<p>I have decided to go with a very simple, practical solution that doesn’t litter
my system with things that is not super necessary.</p>
<p>For virtualization, I will be going with the QEMU backend, with libvirt.
However, all of that will be further abstracted by
<a href="https://github.com/cockpit-project/cockpit-machines" target="_blank">cockpit-machine</a>, a web
interface to interface with libvirt.</p>
<p>cockpit-machine is an add-on component of
<a href="https://cockpit-project.org" target="_blank">Cockpit</a>, which is developed by Red Hat. It is
also installed by default in some RHEL derivatives. It is very handy for
managing individual machines, however not too great for a fleet of machines.</p>
<p>We will also be using zfs to setup a ZRAID array on our disks, and using a linux
bridge to create a bridged network.</p>
<h2>Setting up ZFS</h2>
<pre><code>zpool create tank raidz /dev/sdb /dev/sdd /dev/sda /dev/sdc
mkdir -p /data
zfs create -o mountpoint=/data tank/data
</code></pre>
<p>I am not super familiar with ZFS to be totally honest, and I just followed the
<a href="https://wiki.debian.org/ZFS" target="_blank">Debian wiki on ZFS</a>. I recommend doing further
reading before proceeding.</p>
<p>The first command creates a raidz pool with my 4 disks.
The second and third command creates the mountpoint for the data volume, and
mounting to that directory.</p>
<p>Later, we will put our VM’s disks in the <code>/data</code> directory.</p>
<h2>Bridged Networking</h2>
<p>You want your virtual machines to be sharing a connection with your server’s
NIC. We can solve this easily with a bridge. You may also need the hypervisor to
do NAT, but we will not go over it in this post.</p>
<pre><code>source /etc/network/interfaces.d/*

# The loopback network interface
auto lo
iface lo inet loopback

auto eno1
iface eno1 inet manual

auto br0
iface br0 inet static
        address 198.8.59.3/24
        gateway 198.8.59.1
        dns-nameservers 9.9.9.10 149.112.112.10
        dns-search thtp.bns.sh
        bridge-ports eno1
        bridge-stp off
        bridge-fd 0
</code></pre>
<p>Change the values accordingly, you can also setup an interface on a bond
connection. See below.</p>
<pre><code>auto bond0
iface bond0 inet manual
        bond-slaves enp65s0 enp65s0d1
        bond-mode 802.3ad
</code></pre>
<p><a href="https://pve.proxmox.com/wiki/Network_Configuration" target="_blank">The Proxmox wiki page on network
configuration</a> has a lot of
documentation on other types of network configurations, such as a NAT.</p>
<h2>Installing Packages</h2>
<p>First, we will install the packages that we will need.</p>
<pre><code>apt update
apt install --no-install-recommends cockpit-machines libvirt-daemon-system qemu-system libvirt-clients libvirtd cockpit virt-install virtinst qemu-utils bridge-utils zfsutils-linux linux-headers-amd64
</code></pre>
<p>That should install all the packages that we will need. You should also have a
user account with sudo access created on your machine, since that is what we
will be using to access cockpit.</p>
<h2>Configuring Cockpit</h2>
<p>You can also change the address/port that cockpit listens on via editing a file.
<code>/etc/systemd/system/cockpit.socket.d/listen.conf</code></p>
<p>By default, it will be listening on port <code>9090</code>. You can read more about the
option to changing the listening parameter
<a href="https://cockpit-project.org/guide/latest/listen" target="_blank">here</a>.</p>
<blockquote>
<p>NOTE: The first line with an empty value is intentional. systemd allows
multiple Listen directives to be declared in a single socket unit; an empty
value in a drop-in file resets the list and thus disables the default port
9090 from the original unit. (from above linked documentation)</p>
</blockquote>
<pre><code>[Socket]
ListenStream=
ListenStream=192.168.1.130:443
</code></pre>
<p>Then, you will enable the cockpit socket so that it starts listening on the web
interface.</p>
<pre><code>systemctl enable --now cockpit.socket
</code></pre>
<h2>Using Cockpit</h2>
<p>After you land on the cockpit web interface, you will use your unix user’s
username and password to login. Then, you can escalate your priviledge via the
button on the top bar, provided you have sudo permission.</p>
<p>You should also see the “Virtual machines” tab on the side bar, that is where
you will be setting up your virtual machines.</p>
<p>You can configure the storage pool to other locations besides the default ones.
And we have already setup a network bridge, so there is no reason to touch
libvirt’s bridge options.</p>]]></content>
    <link href="https://ezrizhu.com/blog/cockpit-machine" rel="alternate" />
  </entry>
  <entry>
    <title>Adding SWAP to a Debian Machine</title>
    <id>https://ezrizhu.com/blog/swap</id>
    <published>2024-03-15T00:00:00+08:00</published>
    <updated>2024-03-15T00:00:00+08:00</updated>
    <content type="html" xml:base="https://ezrizhu.com/blog/swap"><![CDATA[<p>So for SWAP, we usually have two choices. A swapfile, and a swap partition.</p>
<p>A swapfile is a lot more flexible since it lives on your filesystem. However, it
does have an added overhead of the filesystem.</p>
<p>Another reason why you may want to use a swap partition is that in case you have
more than one linux distro installed, they can share the same swap partition.</p>
<p>People also <a href="https://askubuntu.com/questions/313564/why-encrypt-the-swap-partition" target="_blank">encrypts their swap
partition</a></p>
<ol>
<li>
<p>First we create the swapfile with 4G <br>
<code>fallocate -l 4G /swapfile</code></p>
</li>
<li>
<p>Then, we set the correct permission for the swapfile <br>
<code>chmod 600 /swapfile</code></p>
</li>
<li>
<p>We now run this to setup the swapfile with the correct headers. <br>
<code>mkswap /swapfile</code></p>
</li>
<li>
<p>We will now run this to enable the swap partition, please note that this is a
transient operation and will not persist if you reboot the system. <br>
<code>swapon /swapfile</code></p>
</li>
<li>
<p>Lastly, we will add the swapfile to our fstab so it will automatically enable
the swapfile on boot. <br>
<code>echo '/swapfile none swap sw 0 0' | sudo tee -a /etc/fstab</code></p>
</li>
</ol>
<p>There are also two sysctl options that you can tweak, either via the sysctl
command (transient), or <code>/etc/sysctl.conf</code> (persistent).</p>
<p><code>vm.swappiness</code> <br>
<code>vm.vfs_cache_pressure</code></p>
<p>Further reading: <a href="https://docs.kernel.org/admin-guide/mm/index.html" target="_blank">kernel Memory Management
docs</a></p>
<p>Adapted from the <a href="https://www.digitalocean.com/community/tutorials/how-to-add-swap-space-on-ubuntu-20-04" target="_blank">DigitalOcean SWAP space
guide</a></p>]]></content>
    <link href="https://ezrizhu.com/blog/swap" rel="alternate" />
  </entry>
  <entry>
    <title>EVE Virtual Environment Introduction</title>
    <id>https://ezrizhu.com/blog/eve</id>
    <published>2024-02-01T00:00:00+08:00</published>
    <updated>2024-02-01T00:00:00+08:00</updated>
    <content type="html" xml:base="https://ezrizhu.com/blog/eve"><![CDATA[<p>I have been using <a href="https://proxmox.com" target="_blank">Proxmox</a> for around three years now. It
was a decent solution for <a href="https://as206628.net" target="_blank">EzriCloud</a> at the time; I only
had one hypervisor in the beginning. Now I have three hypervisors in California,
and a few scattered around the east coast. The three hypervisors are in a
Proxmox cluster. One of the east coast ones is running Proxmox, and the rest are
running <a href="https://libvirt.org" target="_blank">libvirt</a> and
<a href="https://github.com/cockpit-project/cockpit-machines" target="_blank">cockpit-machine</a>.</p>
<p>There are a few reasons why I am developing a Proxmox replacement and stopped
deploying Proxmox. I will try my best to explain them here, however your milage
may vary, and Proxmox is still a great solution for a lot of cases.</p>
<ul>
<li>Custom kernel - Proxmox uses it’s own kernel, which was not something I am a
big fan of. It is built off of a Debian system but with a weird custom Ubuntu
based kernel. I’d much rather all of my Linux machines running off of the same
kernels for consistency sake.</li>
<li>Firewalling - Proxmox also would rather handling their firewalling their own
way, using their own CLIs and file permissions. It makes management for me a
pain at a bigger scale.</li>
<li>Clustering - Proxmox cluster is just a pain. You need at least three for a
quorum, and for a site with only three hypervisors, losing one would not be
fun. Proxmox clustering is also needlessly complicated for my scale.</li>
<li>User management - There isn’t an easy way to manage users across
clusters/silos without having to spin up a LDAP server.</li>
<li>Lack of centralized management - You can’t manage all the clusters and silos
within the same web interface.</li>
</ul>
<p>These are the main reasons that I could think of for now. They may not be deal
breakers for you, but over the years they add up and make me want to switch
away. I considered deploying <a href="https://www.openstack.org" target="_blank">OpenStack</a> as it is one
of the alternatives for bigger scaled operations, but EzriCloud is nowhere as
big that justified a whole OpenStack deployment. An OpenStack deployment was
also extremely complicated and I heard from many friends that it’d take a lot of
effort to maintain.</p>
<p>Here comes Eve and Auto (yes, name was inspired from WALL-E). It’s my first big
software engineering project, so please don’t expect greatness from it.</p>
<p><a href="https://github.com/baseddevelopment/auto" target="_blank">Auto</a> is a daemon that runs on each
Libvirt hypervisor. It communicates to Libvirt and other systems on a Linux
system to  manage virtual machines, firewalls, and storage. Auto exposes a REST
HTTP endpoint for Eve to communicate with.</p>
<p><a href="https://github.com/baseddevelopment/eve" target="_blank">Eve</a> is the main management interface,
it communicates to Auto via mTLS (more on that later). Eve is also a REST API
with both admin and user routes to manage virtual machines across all the
hypervisors via Auto.</p>
<p>The <a href="https://en.wikipedia.org/wiki/Mutual_authentication#mTLS" target="_blank">mTLS</a> setup looks
like this. On initial Eve deployment, we will generate the certificate
authority, and it will sign the Eve certificate. For each Auto deployment, the
sysadmin would first generate a keypair, then a certificate signing request. The
CSR would then be sent to the Eve server to be signed by the CA, then the
certificate would be sent back to Auto. All of these key, CSR, and certificate
generation are all done via the eve and auto binaries.</p>
<p>The Eve database will maintain the fingerprint for each auto certificate, along
with their connection details. Auto’s configuration file will contain Eve’s
certificate fingerprint. Auto will also have the Eve CA’s public key. For each
request between Eve and Auto, both sides will verify each other’s fingerprint,
and the validity of the chain of trust via the CA.</p>
<p>Eve will also support cloud-init, as that is something that most virtualization
solutions should have in the year 2024. I also want to add live-migration
support via libvirt, but I’m not sure yet.</p>
<p>Eve is simply the management API, but I will also develop a web interface for
both users and admins. I think a command line interface would also be nice.
Another idea I had was to have a TUI interface that users and admin can access
via ssh, and authentication would be done automatically via user’s public keys.</p>
<p>Read also: <a href="https://ezrizhu.com/blog/cloud-vnc-proxy" target="_blank">VNC Proxying for Eve</a></p>]]></content>
    <link href="https://ezrizhu.com/blog/eve" rel="alternate" />
  </entry>
  <entry>
    <title>Strange M2 UTM Crypto Bug</title>
    <id>https://ezrizhu.com/blog/m2-cpu-crypto-bug</id>
    <published>2024-01-23T00:00:00+08:00</published>
    <updated>2024-01-23T00:00:00+08:00</updated>
    <content type="html" xml:base="https://ezrizhu.com/blog/m2-cpu-crypto-bug"><![CDATA[<p>So in Operating Systems class, we had to install Debian, Arch, and OpenBSD for
our first homework to get familiar with UNIX systems.</p>
<p>My friend and some other classmates had issues with the Debian installer failing
at the tasksel stage where they were instructed to install Gnome.</p>
<p>This was weird; the tasks step should usually not fail. I tried reproducing the
issue on my VM, but it was installed successfully.</p>
<p>One common denominator within the failed installations was all using the UTM
virtualization software on an M2 Mac machine.</p>
<p>I asked my friend to install a bare-bone Debian machine with nothing selected at
the tassel stage. So, we will have a working system to debug this issue.</p>
<p>After he installed Debian, I asked him to run the apt install
task-gnome-desktop. And that failed with the following.</p>
<pre><code class="language-text">req: Error generating RSA key
40073529347F0000:error:01800079:bignum
routines:ossl_bn_rsa_filps186_4_derive_prime:no prime candidate:../crypto/bn/bn_rsa_flips186_4.c:353: pkg: error processing package
ssl-cert (--configure): Installed ssl-cert package post-installation script subprocess returned error exit status 1
</code></pre>
<p>That’s quite weird. It was related to openssl generating something for ssl-cert.
But do we really need ssl-cert? The answer is no. It was only a recommended
package for task-gnome-desktop. We were able to do a workaround with
<code>apt install --no-install-recommends task-gnome-desktop</code></p>
<p>Great, that’s fine, but we would need a machine with crypto capabilities for
this class… So, I dug into it further.</p>
<p>I tried to isolate the issue by asking him to run openssl genrsa -out aaa.key
2048</p>
<p>That also failed with the “no prime candidate” error. Okay, we know how to
reproduce this error without running some apt post-run hook…</p>
<p>The issue seems to be related to <a href="https://github.com/utmapp/UTM/issues/4924" target="_blank">This UTM issue</a>.</p>
<p>I then asked him to set <code>sysctl -w kernel.printk=8</code> and see if running the
openssl command would generate any kernel debug messages - It did not.</p>
<p>Further debugging showed that it could not connect to any TLS website, with both
ECDSA and RSA certifications.</p>
<p>Then I had an idea: if the issue is with the CPU of the guest machine, what if
we switched it. The PDF the professor gave us told us to use the CPU “Enables
all features supported by the accelerator in the current host (max),” which
could be causing the issue with the crypto part of the CPU.</p>
<p>I asked him to switch to the qemu64 CPU, and the openssl command worked. He also
completed a Debian system installation with the Gnome DE. The professor also
updated the PDF’s macOS instructions to include the CPU that works.</p>
<p>We should also be able to find the specific flags that we could toggle to
perhaps get the original CPU to work, since it was apparently faster.</p>
<p>I also added a comment to that <a href="https://github.com/utmapp/UTM/issues/4924#issuecomment-1903115494" target="_blank">upstream
issue</a>.</p>]]></content>
    <link href="https://ezrizhu.com/blog/m2-cpu-crypto-bug" rel="alternate" />
  </entry>
  <entry>
    <title>Bad Apple (Inc.)</title>
    <id>https://ezrizhu.com/blog/bad-apple</id>
    <published>2023-11-05T00:00:00+08:00</published>
    <updated>2023-11-05T00:00:00+08:00</updated>
    <content type="html" xml:base="https://ezrizhu.com/blog/bad-apple"><![CDATA[<p>On Sep 21, 2023, I ordered and got the new iPhone 15 Pro to replace my old
iPhone X. Shortly after that, in maybe one or two days, my phone prompted me to
re-enter my App Store Apple ID. Note that I use a different Apple ID for my
iCloud and the App Store.</p>
<p>When I put in the password for my App Store Apple ID, it told me that my account
was deactivated. That was strange, so I went thru the support process to get the
account re-activated, perhaps me getting a new phone triggered some alert in
some system. I had nothing else in my account, no chargebacks, no declined
payments, I had also spent a lot of money on that account.</p>
<p>I called Apple support (Sep 24), they said they’d put in a request to get the account
reactivated, and that I should get a response back in 24 hours. In 24 hours, on
Sep 25, I got an email back that the account was reactivated.</p>
<p>I thought that was the end of it, however…</p>
<p>On Oct 7, the account was once again deactivated, I called Apple once on that
day, they said the same thing and that I should get a notification in 24 hours.
I got nothing, I called again on Oct 11, same response, but nothing in 24 hours.</p>
<p>That is quite strange, so on my third call on Oct 12, I asked for the higher
support agent, and I reached someone. They said that they have put in another
request, and scheduled a call-back the next day. The next day, she checked the
request and informed me that Apple could not reactivate the account, and
directed me to the <a href="https://www.apple.com/legal/internet-services/icloud/" target="_blank">iCloud Legal
Agreement</a>. That was
quite unfortunate, it does not appear that the Apple phone support can do
anything.</p>
<p>On Oct 27, I decided to call again, asked for a higher support agent, and explained
the whole situation. They said that they will put in a request to the
Engineering team, and that I should get a response back in a week or two. A few
week has passed, yet no response in the email. I called again and was told that
Apple can not re-activate the account.</p>
<p>This was quite sad, I have spent a considerable amount of money on app
purchases. And they are all down the drain.</p>
<p>Even worse, I can no longer update any apps on the phone, since they were
acquired with the old, deactivated Apple ID. I had to re-install both the iPhone
and the iPad, wasting a lot of hours re-enrolling 2fa apps like Duo and Okta,
re-generate biometric keys both in-app authentication and ssh. By now, Nov 6, I
have finally rolled out the new ssh keys to all of my server infrastructure.</p>
<p>This whole ordeal has caused me a lot of lost time and money, and I was not even
provided a reason as to why it happened.</p>
<p>In the future, I will probably phase out of the Apple Ecosystem, maybe finally
getting a Thinkpad like the rest of the hardcore Linux users.</p>
<p>Update: Nov 27, 2023. Apple has responded to the BBB complaint and have
reactivated the account.</p>]]></content>
    <link href="https://ezrizhu.com/blog/bad-apple" rel="alternate" />
  </entry>
  <entry>
    <title>Hello NixOS!</title>
    <id>https://ezrizhu.com/blog/hello-nix</id>
    <published>2023-10-30T00:00:00+08:00</published>
    <updated>2023-10-30T00:00:00+08:00</updated>
    <content type="html" xml:base="https://ezrizhu.com/blog/hello-nix"><![CDATA[<p>I have decided that I’ll give Nix a go, since a team I am on will be using it.</p>
<p>I think for simple deployments, Nix saves me the hassle of installing new
systems by allowing me to define the entire server in just a few files.</p>
<p>It was pretty nice, I shall paste my boilerplate Nix config here for my future
use.</p>
<pre><code class="language-nix">{ config, pkgs, ... }:

{
  imports =
    [ # Include the results of the hardware scan.
      ./hardware-configuration.nix
      ./thelounge.nix
    ];

  boot.loader.grub.enable = true;
  boot.loader.grub.device = "/dev/vda"; # or "nodev" for efi only

  networking.hostName = "nixplay"; # Define your hostname.
  networking.search = ["bns.sh"];
  networking.nameservers = [ "9.9.9.10" "149.112.112.10" ];
  time.timeZone = "America/New_York";
  i18n.defaultLocale = "en_US.UTF-8";
  users.users.ezri = {
     isNormalUser = true;
     extraGroups = [ "wheel" ];
     openssh.authorizedKeys.keys  = [
       "ssh-ed25519 AAAAC3NzaC1lZDI1NTE5AAAAIN2whKHD8XCH+CQwnagH+iBfkyjc/2f/QEfdsEi0SaKO t2"
     ];
   };
   environment.systemPackages = with pkgs; [
     vim
     wget
     curl
   ];
  virtualisation = {
    podman = {
      enable = true;
      dockerCompat = true;
      defaultNetwork.settings.dns_enabled = true;
    };
  };
  services.openssh.enable = true;
  system.stateVersion = "23.05";
  nix.settings.experimental-features = [ "nix-command" "flakes" ];
  swapDevices = [ {
    device = "/swapfile";
    size = 4*1024;
    randomEncryption.enable = true;
  } ];

}
</code></pre>
<pre><code class="language-nix">{
virtualisation.oci-containers.containers."thelounge" = {
  image = "thelounge/thelounge:latest";
  ports = [ "9000:9000" ];
  autoStart = true;
  volumes = [ "/etc/thelounge:/var/opt/thelounge" ];
};
}
</code></pre>
<p>I used <code>nixos-rebuild switch</code> to switch to the current config.</p>
<p>I also used <code>nix-store --gc</code> to cleanup.</p>
<p>In this current playground, I just deployed thelounge via podman.</p>
<p>I still need to figure out how to use flakes and some other things, but I like
it so far.</p>
<p>If this goes well, I might nix-ify my whole infrastructure.</p>
<p><a href="https://search.nixos.org/packages" target="_blank">nix search</a></p>
<p>Update (Nov 5): I just finished writing the Nix for the org I am working with (Stevens
Blueprint). <a href="https://github.com/stevensblueprint/techops" target="_blank">the nix files can be found
here</a></p>
<p>Currently it has Nginx, Dokuwiki, and Authelia SSO to reverse proxy Dokuwiki.</p>]]></content>
    <link href="https://ezrizhu.com/blog/hello-nix" rel="alternate" />
  </entry>
  <entry>
    <title>VNC Proxying for the Cloud</title>
    <id>https://ezrizhu.com/blog/cloud-vnc-proxy</id>
    <published>2023-10-21T00:00:00+08:00</published>
    <updated>2023-10-21T00:00:00+08:00</updated>
    <content type="html" xml:base="https://ezrizhu.com/blog/cloud-vnc-proxy"><![CDATA[<p>I’m currently working on eve, a management toolkit for libvirt-based
virtualization servers. Think of it as openstack, but for small scale cloud
deployments. I am building it primarily for deployments like EzriCloud, small
scale, multi-siloed, and with user support. It features a management pane, and
it talks to hypervisor agents to interact with libvirt and other systems on each
hypervisor, like firewalling, backups, etc…</p>
<p><a href="https://github.com/BasedDevelopment/eve" target="_blank">Github link to Eve</a>
<a href="https://github.com/BasedDevelopment/auto" target="_blank">Github link to Auto</a></p>
<p>Today we are going to talk about proxying the connection for user consoles. As
with every cloud provider out there, we want to allow our users to access the
server console. In the case of QEMU, this is usually done with VNC.</p>
<p>In my case, giving users a direct connection to the hypervisor isn’t gonna cut
it, because not all hypervisors will have a public address, and we don’t want
people to brute force the VNC’s 8 character passwords.</p>
<p>Thankfully, we already have a software that serves as the bridge between the
user and the hypervisor, and that’s eve, the management pane. Auto is the name
of our hypervisor agent, that’s responsible for managing each hypervisor as
instructed by eve. Eve and Auto talk to each other via HTTPS via a mTLS
connection; auto is a webserver that’s listening for requests from Eve, and it
is listening with a TLS certificate signed by Eve, it also knows Eve’s cert
fingerprint. Eve also performs checks by verifying that Eve’s cert’s fingerprint
is correct and that it’s indeed signed by Eve CA.</p>
<p>Here, we will go over the process between the request first hitting the eve API,
and how we’re sending that to QEMU’s VNC.</p>
<p>First, the request will have to get accepted by our middleware, and usually we
do that with a token that’s issued to the user at login. And the user presents
that in the HTTP header, using Bearer Authentication. However, since VNC is
proxied via websocket, it does not have support for header field.</p>
<p>So we have added a way for the middleware to extract and authenticate the users
token.</p>
<pre><code class="language-go">func getTokenFromQuery(w http.ResponseWriter, r *http.Request)
(tokens.Token, error) {
        tokenString := r.URL.Query().Get("token")
        if tokenString == "" {
                return tokens.Token{}, ErrBadToken
        }

        token, err := tokens.Parse(tokenString)
        if err != nil {
                return tokens.Token{}, ErrBadToken
        }

        return token, nil
}
</code></pre>
<p>Here, the request hits eve and gets sent to GetVMConsole, we’re using
<code>getUserVM</code> to check if we have the VM that the user is asking, and we get the
hypervisor and vm types. We then call the hypervisor’s websocket method with the
VM type’s UUID, and the rest of the request.</p>
<pre><code class="language-go">func GetVMConsole(w http.ResponseWriter, r *http.Request) {
        hv, vm := getUserVM(w, r)
        if vm == nil {
                eUtil.WriteError(w, r, nil, http.StatusNotFound,
                "virtual machine not found")
                return
        }

        hv.Auto.WsReq(w, r, vm.ID.String())
}
</code></pre>
<p>Then, we construct the URL that we will be reverse proxying from auto, and
sending it off to auto’s WSProxy method.</p>
<pre><code class="language-go">func (a *Auto) WsReq(w http.ResponseWriter, r *http.Request, domid string) {
        wsUrl, err := url.Parse(a.Url)
        if err != nil {
                return
        }
        wsUrl.Path = "/libvirt/domains/" + domid + "/console"
        a.WSProxy(wsUrl, w, r)
}
</code></pre>
<p>Now, we will be creating our https client from our TLS configurations, and
creating the reverse proxy. We’re also stripping the path and query that the
user sent us.</p>
<pre><code class="language-go">func (a *Auto) WSProxy(wsUrl *url.URL, w http.ResponseWriter, r *http.Request) {
        tlsConfig := a.getTLSConfig()

        proxy := httputil.NewSingleHostReverseProxy(wsUrl)
        proxy.Transport = &amp;http.Transport{
                TLSClientConfig: tlsConfig,
        }

        rr := r.Clone(r.Context())
        rr.URL.Path = ""
        rr.URL.RawQuery = ""

        proxy.ServeHTTP(w, rr)
}
</code></pre>
<p>Now we’re switching over to Auto.</p>
<p>Here, auto will first fetch and domain (libvirt’s way of calling a machine), and
using the <code>GetVMConsole</code> method to fetch the VNC port. Then, we’re stripping the
url PATH that we received from eve, since it won’t play nicely with the VNC
server. Lastly, we re-write the websocket request and reverse proxy that.</p>
<pre><code class="language-go">func GetConsole(w http.ResponseWriter, r *http.Request) {
        domain, err := getDomain(r)
        if err != nil {
                eUtil.WriteError(w, r, err, http.StatusNotFound,
                "Invalid domain ID or can't be found")
                return
        }

        port, err := HV.GetVMConsole(domain)
        if err != nil {
                eUtil.WriteError(w, r, err, http.StatusInternalServerError,
                "Failed to get console port")
                return
        }

        // Since libvirt's vnc doesn't accept any path,
        // we will rewrite it to empty since proxyer will add it
        r.URL.Path = ""
        wsUrl := &amp;url.URL{Scheme: "http", Host: "localhost:" + port}

        proxy := httputil.NewSingleHostReverseProxy(wsUrl)
        proxy.ServeHTTP(w, r)
}
</code></pre>
<p>And there we have it, the Auto instance reverse proxies the websocket connection
from the local QEMU connection. The Eve instance authenticates and reverse
proxies the websocket connection from the Auto instance.</p>
<p>I’m not sure if this is the industry standard way of doing this, but this method
works for me, and perhaps will be for other people.</p>]]></content>
    <link href="https://ezrizhu.com/blog/cloud-vnc-proxy" rel="alternate" />
  </entry>
  <entry>
    <title>Network Latency and CPU</title>
    <id>https://ezrizhu.com/blog/network-latency-and-cpu</id>
    <published>2023-09-17T00:00:00+08:00</published>
    <updated>2023-09-17T00:00:00+08:00</updated>
    <content type="html" xml:base="https://ezrizhu.com/blog/network-latency-and-cpu"><![CDATA[<p>For my NYC network, I have been tunneling everything thru a
<a href="https://www.wireguard.com/" target="_blank">wireguard</a> tunnel to
<a href="https://www.vultr.com/" target="_blank">Vultr</a> for BGP.</p>
<p>Usually it is not this way, it should always be using my upstream’s routers, but
currently they’re down right now. So I am basically tunneling to Vultr and use
them as my BGP upstream.</p>
<p>But since I have made the switch, the latency to my servers has been
dramatically higher, and it didn’t make a lot of sense.</p>
<pre><code class="language-text">ezri in ide0 in ~ took 11s
λ ping 1.1
PING 1.1 (1.0.0.1) 56(84) bytes of data.
64 bytes from 1.0.0.1: icmp_seq=1 ttl=56 time=22.5 ms
64 bytes from 1.0.0.1: icmp_seq=2 ttl=56 time=15.2 ms
64 bytes from 1.0.0.1: icmp_seq=4 ttl=56 time=107 ms
64 bytes from 1.0.0.1: icmp_seq=5 ttl=56 time=91.2 ms
64 bytes from 1.0.0.1: icmp_seq=6 ttl=56 time=56.6 ms
64 bytes from 1.0.0.1: icmp_seq=7 ttl=56 time=97.8 ms
64 bytes from 1.0.0.1: icmp_seq=8 ttl=56 time=77.6 ms
64 bytes from 1.0.0.1: icmp_seq=9 ttl=56 time=77.7 ms
64 bytes from 1.0.0.1: icmp_seq=10 ttl=56 time=131 ms
64 bytes from 1.0.0.1: icmp_seq=11 ttl=56 time=164 ms
64 bytes from 1.0.0.1: icmp_seq=12 ttl=56 time=166 ms
64 bytes from 1.0.0.1: icmp_seq=13 ttl=56 time=213 ms
64 bytes from 1.0.0.1: icmp_seq=14 ttl=56 time=218 ms
64 bytes from 1.0.0.1: icmp_seq=15 ttl=56 time=215 ms
64 bytes from 1.0.0.1: icmp_seq=16 ttl=56 time=422 ms
64 bytes from 1.0.0.1: icmp_seq=17 ttl=56 time=217 ms
64 bytes from 1.0.0.1: icmp_seq=18 ttl=56 time=273 ms
64 bytes from 1.0.0.1: icmp_seq=19 ttl=56 time=221 ms
64 bytes from 1.0.0.1: icmp_seq=21 ttl=56 time=117 ms
64 bytes from 1.0.0.1: icmp_seq=22 ttl=56 time=41.3 ms
64 bytes from 1.0.0.1: icmp_seq=24 ttl=56 time=13.4 ms
</code></pre>
<p>The ping was fluctuating from 22 to 221, which is very strange… My first thought
was that the network connection is just very unstable, but that shouldn’t be the
case.</p>
<p>Pinging the Vultr server directly resulted in the following.</p>
<pre><code class="language-text">rtt min/avg/max/mdev = 2.181/7.680/30.317/8.120 ms
</code></pre>
<p>Even adding in the round trip time, it should not be 200-400ms!</p>
<p>So the issue was probably on the Vultr server, and a ping to cloudflare did
result in some high uptick in latency.</p>
<pre><code class="language-text">rtt min/avg/max/mdev = 2.430/33.384/138.564/40.807
</code></pre>
<p>I tried this in another machine on the vultr, and the latency to cloudflare was
consistently well, below 5ms.</p>
<p>So I thought, maybe it’s the CPU, but the load average was only 0.2, on the 1
core router machine… But there’s no other explanation…</p>
<p>I decided to do some controlled experiment, I turned off the wireguard tunnel,
ran a mtr, turned it on, then ran another mtr. Perhaps it <em>is</em> the CPU, and that
if I turned off the wireguard tunnel, the latency would decrease.</p>
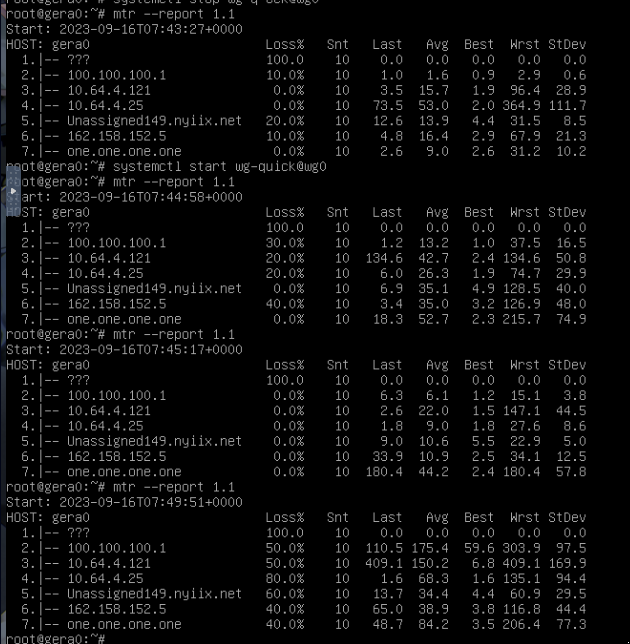
<p><img alt="screenshot of a screen showing good latency while wireguard is off, but up to 200ms when it’s back on" src="/assets/img/blog/20230917-mtr.png"></p>
<p>Huh, that explains it! When the wireguard tunnel is off, the latency is pretty
good, but when it is back on and processing my traffic, the latency skyrockets,
even tho the load time is only .2 on the single-core machine.</p>
<p>Looking back at the Vultr plans, I was using the High Performance AMD cores, I
thought that those are probably fast enough, but it seems like it’s just their
fancy wording for “burstable CPUs”.</p>
<p>I decided to switch to their “CPU Optimized” compute instances, since it
looked like it can handle more CPU intensive workloads like routing all my
packets. There’s also High Frequency, tho I am not sure how much that will help
here.</p>
<p>The switch-over was fairly simple, I converted that router’s current IP to a
reserved floating IP so I don’t have to change the IP address. I then took a
snapshot, but that took a while. After the snapshot finishes, I removed the
router VM to free up that reserved IP, created a new instance for the router,
re-assigned the IP address, restored the snapshot.</p>
<pre><code class="language-text">Before:
rtt min/avg/max/mdev = 119.650/172.541/217.483/35.735 ms
After:
rtt min/avg/max/mdev = 5.686/6.738/7.449/0.584 ms
</code></pre>
<p>Wow, that’s an improvement, so it seems like switching to a better instance
fixed my latency issue. 🎉</p>]]></content>
    <link href="https://ezrizhu.com/blog/network-latency-and-cpu" rel="alternate" />
  </entry>
  <entry>
    <title>Installing Debian From Any Linux Distro</title>
    <id>https://ezrizhu.com/blog/debian-via-linux</id>
    <published>2023-09-10T00:00:00+08:00</published>
    <updated>2023-09-10T00:00:00+08:00</updated>
    <content type="html" xml:base="https://ezrizhu.com/blog/debian-via-linux"><![CDATA[<p>There are times where you have to install a Debian machine, but you don’t have
access to a debian iso, or you don’t already have a USB stick ready. This
happened recently to me when I was volunteering at
<a href="https://www.nycmesh.net/" target="_blank">NYCMesh</a>. We needed to install Debian on a machine,
but I only had my arch linux iso for some reason.</p>
<p>I remembered stumbling upon <a href="https://www.debian.org/releases/bookworm/amd64/apds03.en.html" target="_blank">this debian page on installing from a linux
machine</a> (the
original link was broken since debian made new releases, but the content is
similar). This was exactly what I needed, but some commands had to be changed to
fit that system, which I will outline later.</p>
<p>This is similar to the install process of some more hardcore linux distros, like
arch, void, and gentoo. So because I had experience installing distros from
scratch, the process was pretty straightforward.</p>
<ol>
<li>You format the disks and mount them</li>
<li>run your distro’s bootstrap script on that mount (this sets up the package
manager)</li>
<li><code>chroot</code> into the disk</li>
<li>install base packages, like your linux image, headers, bootloader, etc…</li>
<li>setup things like your keyboard layout, locale, time, networking, drivers</li>
<li>install the bootloader</li>
<li>restart and pray that it all works</li>
</ol>
<p>The debian guide I linked above contains pretty much everything that you’ll
need. However, I ran into some issues trying to install the grub bootloader, for
my future convenience and whoever is out there that ran into the same issue as
me, I’ll write down what I did.</p>
<p>It appears that grub needs to know where your boot drive is, but it was not able
to because your drives were not properly mapped in /dev. But you can fix it by
doing the following from <a href="https://wiki.debian.org/RescueLive" target="_blank">RescueLive Guide</a>
before entering the <code>chroot</code>.</p>
<p><code>for name in proc sys dev ; do mount --bind /$name /mnt/$name; done</code></p>
<p>This command will mount proc, sys, dev to your chroot, so grub can read them
inside your new linux instance.</p>
<p><code>grub-install</code> also had to be run with <code>--force</code> for some reason still
unbeknownst to me. If you have any idea of why this is the case, please let me
know.</p>
<p>I am still not super familiar with the process, and my memory of it is a big
foggy since I did this a few weeks ago, I have just been really busy and not
been able to write this down.</p>
<p>(I also ended up installing <a href="https://www.ventoy.net" target="_blank">Ventoy</a> on my USB drive so
I can load up multiple linux images onto it)</p>]]></content>
    <link href="https://ezrizhu.com/blog/debian-via-linux" rel="alternate" />
  </entry>
  <entry>
    <title>August Server Upgrades (5 Hours of Dread)</title>
    <id>https://ezrizhu.com/blog/aug3-server-upgrades</id>
    <published>2023-08-14T00:00:00+08:00</published>
    <updated>2023-08-14T00:00:00+08:00</updated>
    <content type="html" xml:base="https://ezrizhu.com/blog/aug3-server-upgrades"><![CDATA[<p>I run a small sized server infrastructure consisting of mainly three hypervisors
in California, and one hypervisor in NYC. Those servers are all owned and
maintained by me, with the occasional help of the helpful datacenter staff. You
can read more about EzriCloud <a href="https://ezrizhu.com/projects/ezricloud" target="_blank">here</a></p>
<p>My servers were awfully out of date, being two major versions behind on Proxmox,
and Debian. I have been ignoring the EOL warning as I thought I would have
finished writing my Proxmox Replacement <a href="https://ezrizhu.com/projects/eve" target="_blank">Eve
Suite</a> soon. But I have came to the realization
that it will still take me a while, and that it’s not super safe being
vulnerable to all the vulnerabilities out there to Linux and Proxmox. That’s
where I have decided to upgrade all my hypervisors and other machines that runs
Linux. I also had to renumber my servers to a new IP range, so I decided to use
this opportunity to renumber as-well.</p>
<p><img alt="Screenshot of Proxmox showing 1k+ days of uptime on my servers" src="/assets/img/blog/20230814-uptime.png"></p>
<p>And here is where the dreaded night of upgrading and renumbering Proxmox came
in. I posted a maintenance window of two hours, and first started upgrading my
linux VMs as they won’t impact anyone besides the few BGP downstreams.</p>
<p>It wasn’t long after changing the repositories from Debian 10 to Debian 12 that
I ran into my first issue. Linux kernel refused to build because I had
wireguard-dkms and aufs-dkms installed. Wireguard was introduced to the Linux
kernel, and so the wireguard-dkms upgrade script will not run for the newest
debian kernel, so I had to remove that package. A similar issue happened with
aufs-dkms, although I don’t ever remember installing that in the first place.
After I removed those two packages, apt was able to successfully build my Linux
kernels and the initramfs.</p>
<p>This issue was also discussed in the <a href="https://groups.google.com/g/linux.debian.bugs.dist/c/mz2SZm62TAA" target="_blank">debian mailing
lists</a></p>
<p>Soon enough, another issue came up. Because I was jumping from Debian 10 to
Debian 12, libcrypt.so.1 was not able to open shared object file when upgrading.
After doing a lot of googling and kind of regret doing this at 12am, I stumbled
upon <a href="https://groups.google.com/g/linux.debian.bugs.dist/c/3rZpOKvCh5E?pli=1" target="_blank">this mailing list
post</a>
Aha! Someone ran into the same issue as me, while jumping a version when
upgrading. I followed the instructions that someone posted in the thread;
manually downloading libcrypt1 and unpacking the files into /lib, and it
resolved my issue.</p>
<p>After painstakingly upgrading the route collector and other linux VMs, and the
clock is now at 0:22, I have started to shut down user VMs and prepare the three
hypervisors for upgrades.</p>
<p>After learning the lesson to not jump the upgrade, I have decided to first
change the repos to debian 11, do a full-upgrade, then change the repos to
debian 12 and do a full-upgrade. I’m also upgrading the machine one by one so
Proxmox doesn’t freak out about missing quorum.</p>
<p>First issue: box0.sn3 (a hypervisor I have in NYC) seems to be not booting back
up, I wasn’t able to see much text on the
<a href="https://en.wikipedia.org/wiki/Dell_DRAC" target="_blank">iDRAC</a> since It was very blurry, and I
didn’t want to get the java applet to connect to the console since it was
running on iDRAC6 and did not have the HTML console. I attempted a cold reboot
via the iDRAC and the machine came back normally. Perhaps it was stuck in a
systemd shutdown service.</p>
<p>Then, box0.he2 (a dell r810 at California) was also not coming back up. I was
also not able to connect to that server’s iDRAC, I could not even ping the
iDRAC. That was very strange, I have never seen the iDRAC become unresponsive
like that. I phoned up the datacenter and asked them to go and reboot the
machine. The datacenter technician came back on the phone and told me that he
saw something very weird, that the LDC panel was lit, but blank, none of the
other lights were flashing, and that the machine was unresponsive to the button
press. That sounded very strange, however it does line up with iDRAC being
unresponsive to ICMP pings. I asked the kind technical to unplug and replug the
power cables to the server and see if that can restart the iDRAC. Thankfully
that brought the server back up, however…</p>
<p>The iDRAC came back online and was responding to pings, I thanked the datacenter
technical and hung up the phone. Although Linux is still not coming back up, I
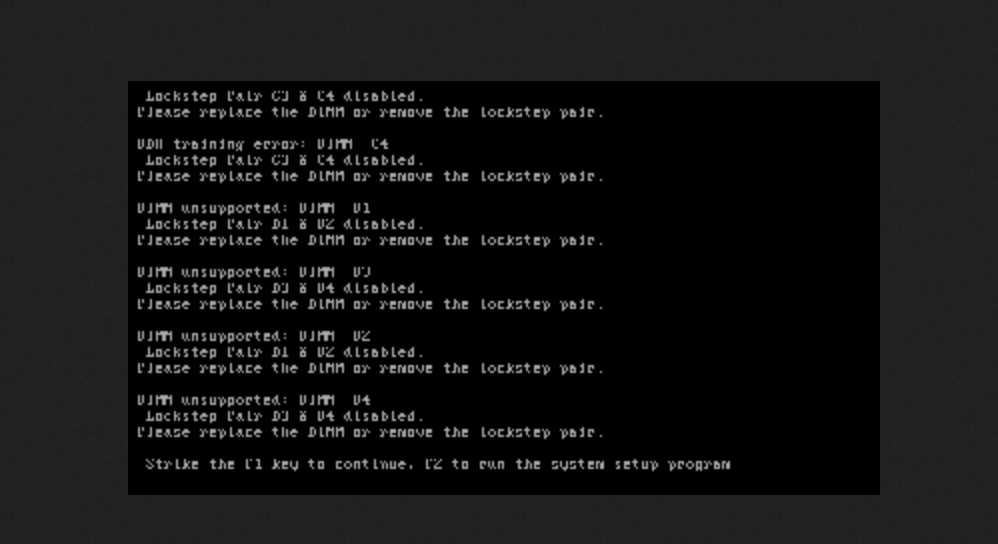
logged in to iDRAC to investigate. “DIMM Unsupported……  Strike the F1 key to
continue, F2 to open system setup” What??? That’s strange, my RAM is supposed to
be fine. I asked a friend for the <a href="https://github.com/scottjg/systemscope" target="_blank">link to the macOS iDRAC
viewer</a> and accessed the console. I
struck F1 and watched as Linux booted up normally, and that all my RAM showed up
in the system, although at a slower clock speed. I restarted the machine again
and the same prompt appeared, I struck F1 and accepted the slower clock speed.</p>
<p><img alt="screenshot of the server console reporting unsupported DIMMs" src="/assets/img/blog/20230814-dimm.png"></p>
<p>Although I would love to investigate why that was happening, but because I live
in NYC, and the server is in California. I do not have the energy or the money
to travel to California to see why that ancient r810 is acting up.</p>
<p>After Linux booted up and as Proxmox is attempting to spin the VMs back up, I
got “KVM not enabled”. What? KVM was enabled, I guessed that the CMOS battery
must’ve died and reset the BIOS, I also took the chance to double check that the
clock cycle of the RAM was correct in the BIOS, although it was indeed correct.
After enabling KVM, striking F1 to continue to boot process, I was able to
successfully bring box0he2 back up!</p>
<p>Great, now that all my hypervisors are up to date, time to renumber them. I had
done a bit of research beforehand on renumbering clustered Proxmox instances, so
it was fairly easy. I stopped the Proxmox damons, edited the appropriate
configuration files, incremented the version of the config files so it doesn’t
get overwritten on sync, and restarted the damons. Or so that’s how I wish it
went, I forgot to increment the version of the config files and Proxmox kept
overwriting the IP addresses of it’s nodes. But eventually I figured it out.</p>
<p>At this point, all the machines are now up to date and renumbered, but for some
reason unbeknownst to me yet my downstream’s IPs were not being announced… It’d
appears that my route collector took too long, and Hurricane Electric had
already done their filter refresh. I emailed them and they were able to quickly
refresh my filter.</p>
<p>The time is now 4:52 am, almost three hours past the expected end of the
maintenance window. I head to sleep as I need to pack up to prepare to move to
my new apartment tomorrow. Hopefully this is the last time I upgrade Proxmox,
this experience was a great motivation to me to finish writing <a href="https://ezrizhu.com/projects/eve" target="_blank">Eve
Suite</a>.</p>
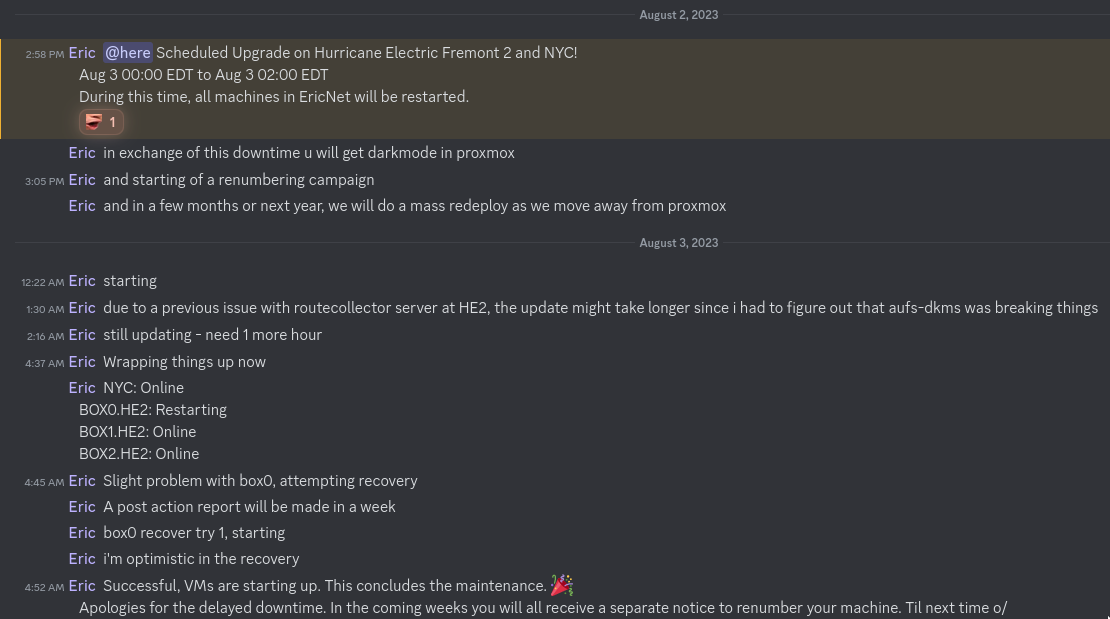
<p><img alt="screenshot of me notifying my users the status of this server upgrade" src="/assets/img/blog/20230814-screenshot.png"></p>]]></content>
    <link href="https://ezrizhu.com/blog/aug3-server-upgrades" rel="alternate" />
  </entry>
  <entry>
    <title>Hello IndieWeb!</title>
    <id>https://ezrizhu.com/blog/hello-indieweb</id>
    <published>2023-08-01T00:00:00+08:00</published>
    <updated>2023-08-01T00:00:00+08:00</updated>
    <content type="html" xml:base="https://ezrizhu.com/blog/hello-indieweb"><![CDATA[<p>Short update! My website now supports the following
<a href="https://indieweb.org/" target="_blank">IndieWeb</a> protocols.</p>
<ul>
<li><a href="https://microformats.org/wiki/h-card" target="_blank">h-card</a></li>
<li><a href="https://microformats.org/wiki/h-entry" target="_blank">h-entry</a></li>
<li><a href="https://microformats.org/wiki/RelMeAuth" target="_blank">RelMeAuth</a></li>
<li><a href="https://en.wikipedia.org/wiki/Webmention" target="_blank">webmention</a></li>
</ul>
<p>The <code>h-card</code> and <code>h-entry</code> are just some machine readable code about my website
and my blog entries. They’re both implemented as hidden <code>div</code>s.</p>
<p>RelMeAuth is just a <code>rel=me</code> email link so services can discover my email as a
authentication method.</p>
<p>For webmention, I wrote a simple <a href="https://go.dev/" target="_blank">GoLang</a> API that accepts
webmention query and sends them to me as a discord webhook. The source can be
found <a href="https://github.com/ezrizhu/dismention" target="_blank">here</a></p>
<p>This website is my home, so I thought it’d be nice if it is somewhat connected with
the rest of the IndieWeb blogging scene.</p>
<hr>
<p>This post was <a href="https://en.wikipedia.org/wiki/Webmention" target="_blank">webmentioned</a> once.
Thank you!</p>
<ul>
<li><a href="https://snarfed.org/2023-08-11_hello-indieweb-tianyu-eric-zhu" target="_blank">snarfed.org</a></li>
</ul>]]></content>
    <link href="https://ezrizhu.com/blog/hello-indieweb" rel="alternate" />
  </entry>
  <entry>
    <title>I'll Read It</title>
    <id>https://ezrizhu.com/blog/ill-read-it</id>
    <published>2023-07-31T00:00:00+08:00</published>
    <updated>2023-07-31T00:00:00+08:00</updated>
    <content type="html" xml:base="https://ezrizhu.com/blog/ill-read-it"><![CDATA[<p>I was inspired by <a href="https://manuelmoreale.com/i-ll-read-it" target="_blank">Manu’s I’ll read it</a>.</p>
<blockquote>
<p>“I don’t know what to write about” and “what if no one will read it?”. These
are the two most common reasons why people don’t want to start a personal
blog. I already addressed the first one, so let me tackle the second one in
the easiest way possible: I’ll read it. If you decide to start a blog in
either English or Italian, I’ll read it. I don’t care about the topic. Start a
blog, write something, send it to me, and I’ll read it.</p>
</blockquote>
<p>I’d love to read your blog! For following three reasons.</p>
<ul>
<li>Meet new people, foster new connections</li>
<li>Encourage people to write more</li>
<li>See what others have to say about things</li>
</ul>
<p>If you are afraid that you don’t have anything interesting to say, then write
about whatever is on your mind today.</p>
<p>If you are afraid that no one will read it, <strong>I’ll read it</strong>.</p>
<p>I can also read simplified Chinese, and would love to connect with more people
back in China.</p>
<p>So please, <a href="mailto:me@ezrizhu.com" target="_blank">send them over</a>.</p>]]></content>
    <link href="https://ezrizhu.com/blog/ill-read-it" rel="alternate" />
  </entry>
  <entry>
    <title>Why I Still Use Github</title>
    <id>https://ezrizhu.com/blog/using-github</id>
    <published>2023-07-31T00:00:00+08:00</published>
    <updated>2023-07-31T00:00:00+08:00</updated>
    <content type="html" xml:base="https://ezrizhu.com/blog/using-github"><![CDATA[<p>For the past few months, I have seen a lot of people discussing how they’re
moving away from Github to other git hosting services like
<a href="https://sourcehut.org" target="_blank">Sourcehut</a>, <a href="https://gitea.com" target="_blank">Gitea</a>, and other hosted
or self-hosted alternatives. Mainly due to Github using public repositories to
train <a href="https://github.com/features/copilot" target="_blank">Co-Pilot</a>, and to have control over
their own code. I have thought a lot about this, and decided that, for the near
future, to stick with Github for most projects. Let me explain why.</p>
<p>I’m a student, my primary goal right now is to complete my studies and land a
job. To do that, I plan on doing well in school, and do other extracurricular
programming activities to stand out, making myself a more attractive applicant.
With Github being the most popular git hosting platform out there, I think
recruiters will look at my Github and see what I have been up to, along with
other metrics that they can see from my <a href="https://github.com/ezrizhu" target="_blank">Github
profile</a>.</p>
<p>Github has nice features like the activity graph that shows people how much I
contribute to projects on github, and the organizations I am associated with.
These information are all displayed on my Github profile, and allow recruiters
to have a crystal clear view of my contributions to various projects, and my own
projects.</p>
<p>One of the bigger reasons is the ease of use, my friends need not to learn how
to use all of Git to contribute to my projects. With in-line code editing, pull
requests, and issues, Github enables more novice programmers to contribute to
open source.</p>
<p>Github Actions is great, I use it to power almost, if not all of my CI/CD
pipelines. Considering most of my projects are public repositories, I basically
get unlimited free compute. I get to focus only on writing code, and not the
underlying testing and deployment infrastructure.</p>
<p>Github has a tightly integrated ecosystem that is constantly growing. I watched
Github add it’s kanban board, wiki, and discussions. All of them had made Github
a great platform to grow a developer team. Teams no longer have to find their
own wiki platform, or to pick between kanban solutions.
<a href="https://sitblueprint.com" target="_blank">Blueprint@Stevens</a> chose Github because it allows us
to focus on getting our engineers working on our client’s projects, not to dwell
on the infrastructure, and how to connect them together.</p>
<p>However, there are cases where I will not use Github for, like schoolwork. I
usually have copilot enabled on my neovim setup, as it allows me to quickly
write boilerplate code to kick start projects. One day when I was working on a
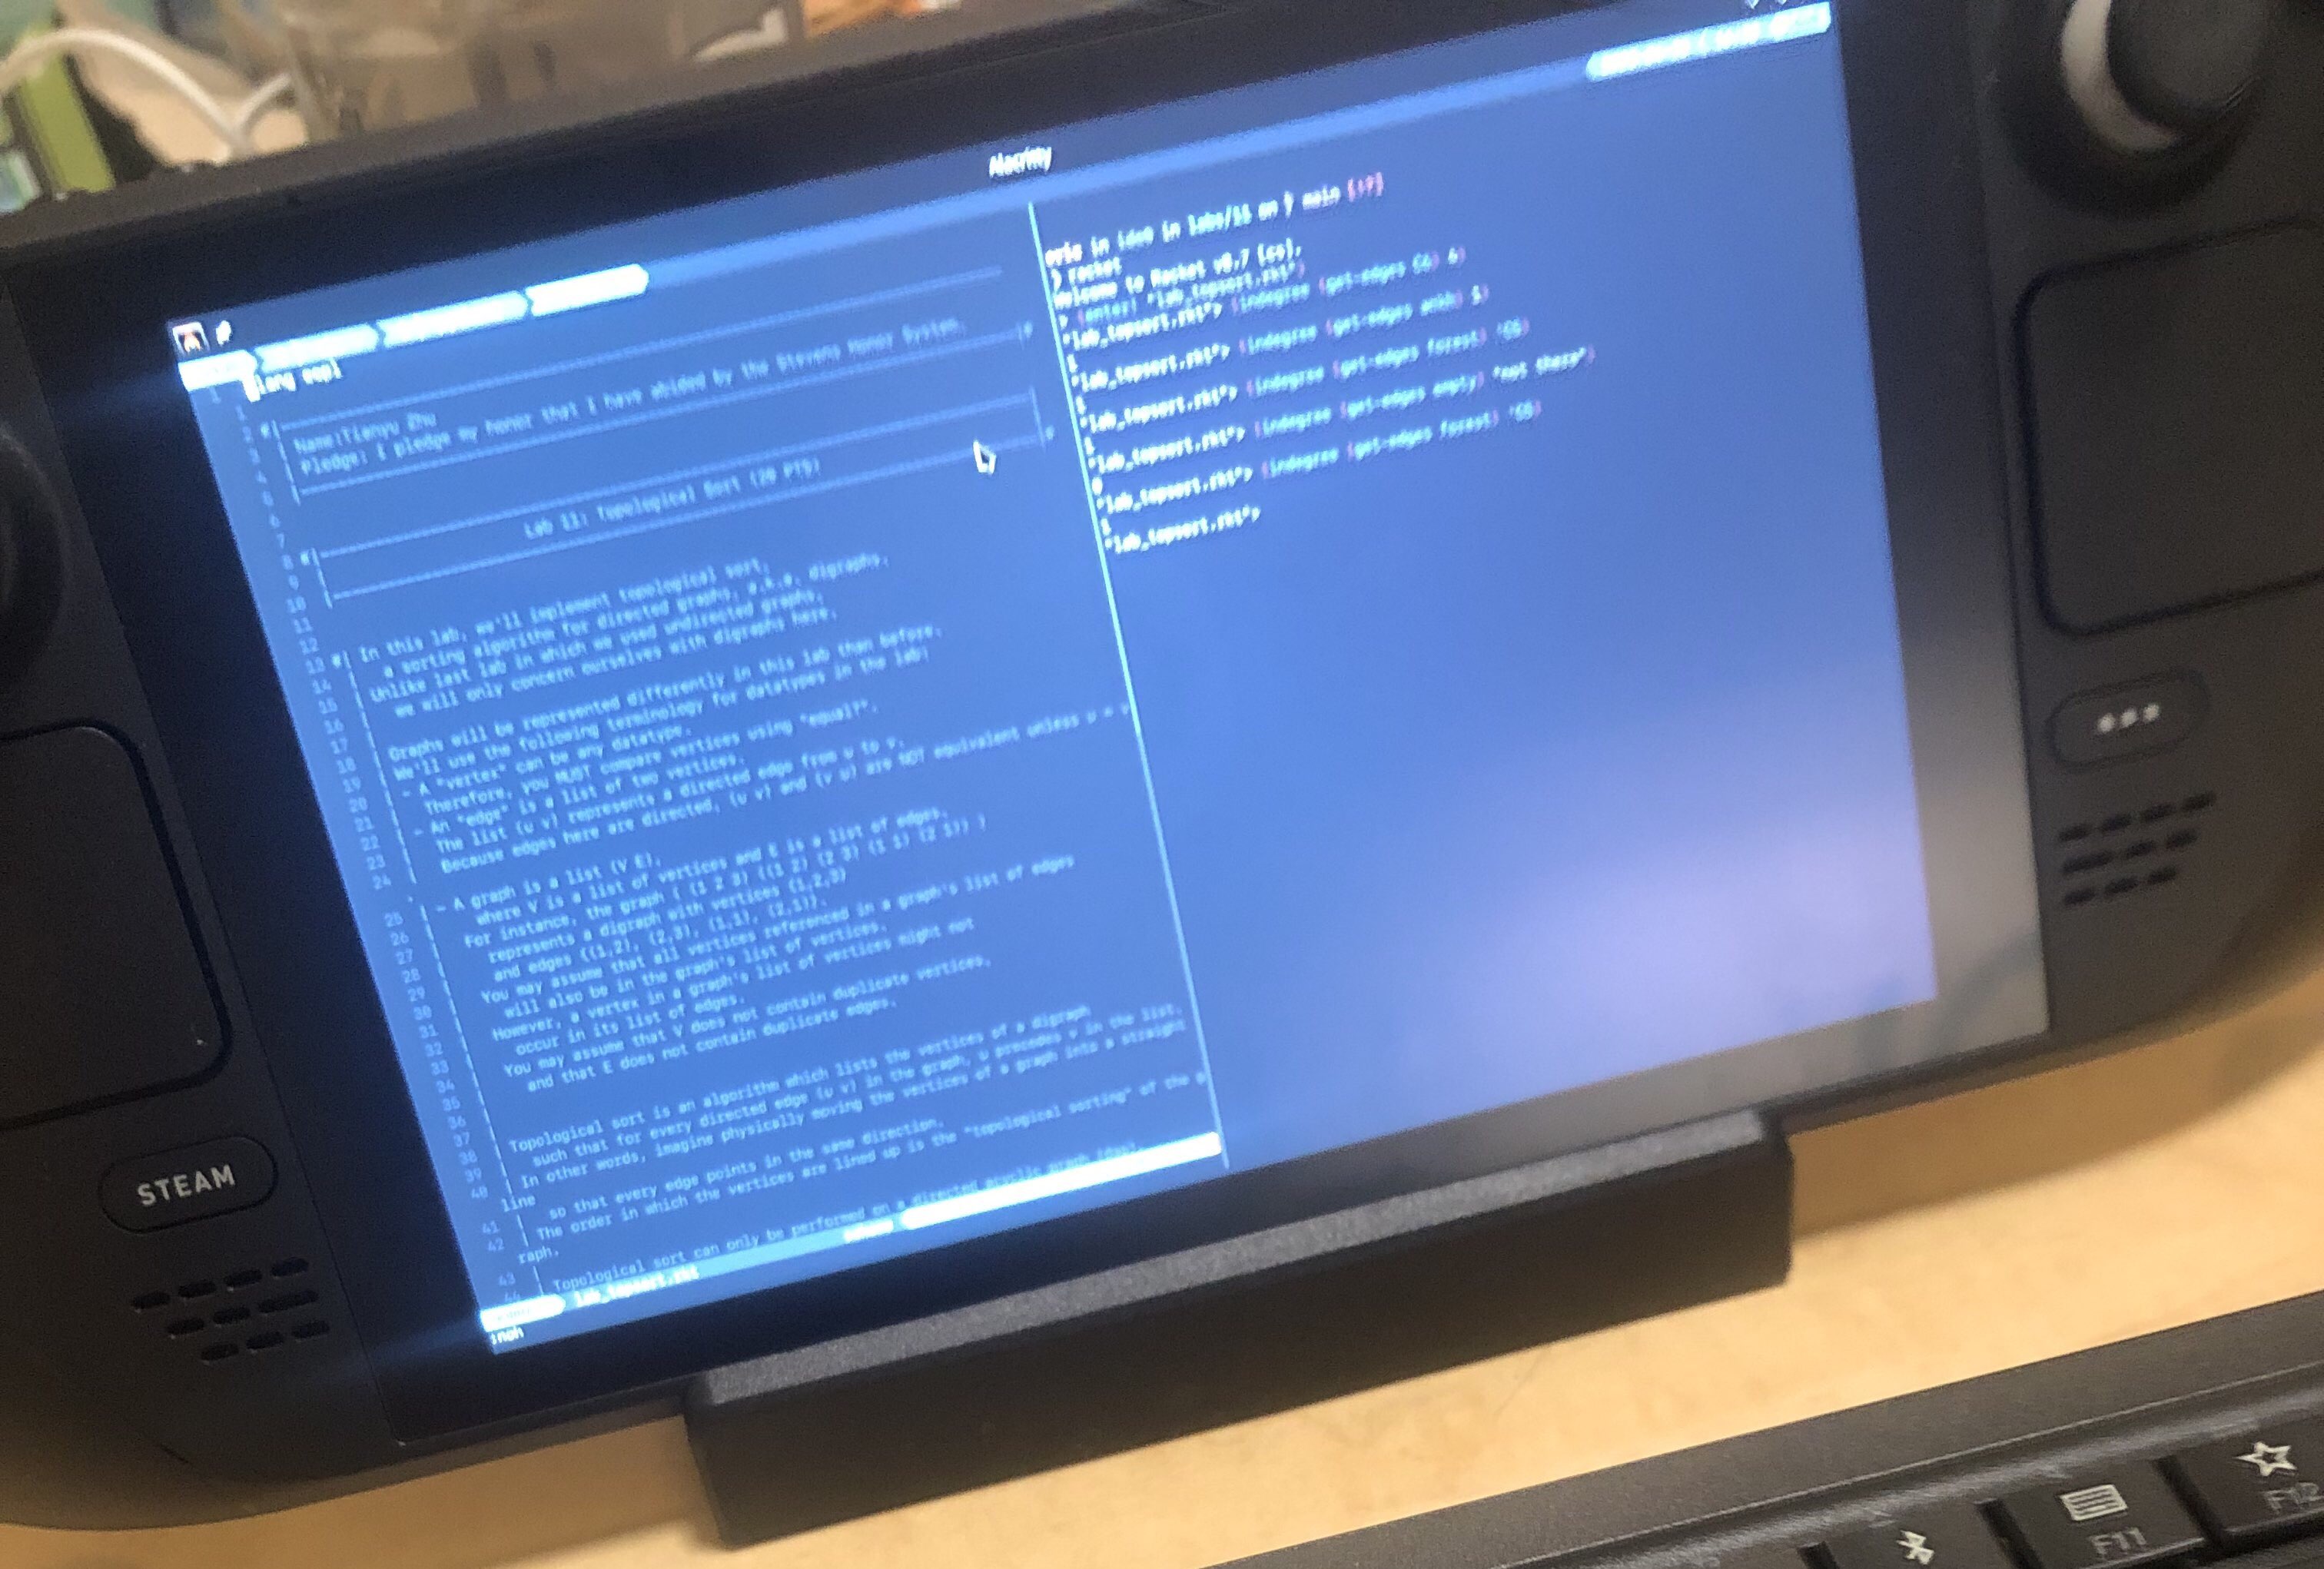
schoolwork, I was in the middle of writing the school mandated Honor Pledge, “I
pledge my honor that…” and then, Co-Pilot had completed the rest, “I have abided
by the Stevens Honor System”. I was shocked, how did Co-Pilot know my schools
honor pledge? I searched on Github and found that students had been uploading
their schoolwork on Github, and Co-Pilot has been training off of them.</p>
<p>This isn’t great, and I really hope no lazy Stevens CS majors are reading this.
But I had realized that Github isn’t the place to put source code that you don’t
want the AI to give to other students. Although Github has now introduced an
option to deny them access to train their models using your code, them doing
that in the first place without any prior communication puts a bad taste in my
mouth.</p>
<p>Currently, all of my schoolwork are on sourcehut. For one of my freshman
classes, we had to work on problem sets for discrete structures in pairs. I
setup a sourcehut build script to automatically run pdflatex on the week’s
homework directory and upload the resulting pdf as an artifact. This did the
job, and I really enjoy using sourcehut due to it’s simplicity. However, I
understand that some people will have a harder time using it if they’re not
super familiar with git.</p>
<p>In the future, when I have a comfortable job, I will consider moving my projects
to other services. Although I will still be active on Github to contribute to
other open source projects. But for the foreseeable future, I’ll stick to
Github.</p>]]></content>
    <link href="https://ezrizhu.com/blog/using-github" rel="alternate" />
  </entry>
  <entry>
    <title>Website Updates</title>
    <id>https://ezrizhu.com/blog/site-update</id>
    <published>2023-07-28T00:00:00+08:00</published>
    <updated>2023-07-28T00:00:00+08:00</updated>
    <content type="html" xml:base="https://ezrizhu.com/blog/site-update"><![CDATA[<p>I have been diving deeper into the whole indieweb scene and gotten some
inspirations from other people’s blogs, and here are some changes.</p>
<p>I also saw <a href="https://manuelmoreale.com/i-ll-read-it" target="_blank">Manu’s I’ll read it page</a>
and reached out to him about my blog, he suggested a lot of fixes that were very
useful.</p>
<h2>What’s New</h2>
<ul>
<li>A <a href="/now" target="_blank">now page</a> showing things I am doing right now.</li>
<li>Projects now also support tags with the tech that I used.</li>
<li>Added a call-to-email me link under every blog.</li>
</ul>
<h2>What’s Changed</h2>
<ul>
<li>Links (with the only exception of the menu) are now underlined for
accessibility. Visited links are now in a different color.</li>
<li>Blog posts, index, and news are now wrapped to 85 characters, heading and
paragraph spaces have also been increased for clarity.</li>
<li>Link added to the webring so people can learn about it.</li>
<li>Tag spacing in blog posts has also been improved to make them easier to click.</li>
</ul>
<h2>Future Plans</h2>
<ul>
<li>I think using something like rust’s Arc(?), allow for runtime webring refresh,
this will also lay the groundwork for other dynamic content like a comments
section.</li>
<li>Server side syntax highlighting for code blocks.</li>
<li>And the other future plans from the bottom of <a href="https://ezrizhu.com/blog/this-blog" target="_blank">my last post about this
website</a>.</li>
<li>Blog roll.</li>
<li>Resume as html, with pdf link contained within</li>
</ul>]]></content>
    <link href="https://ezrizhu.com/blog/site-update" rel="alternate" />
  </entry>
  <entry>
    <title>A Rant on Safari</title>
    <id>https://ezrizhu.com/blog/safari-rant</id>
    <published>2023-07-28T00:00:00+08:00</published>
    <updated>2023-07-28T00:00:00+08:00</updated>
    <content type="html" xml:base="https://ezrizhu.com/blog/safari-rant"><![CDATA[<h2>The start of it all</h2>
<p>So I was testing my new website css with my iPad since I can easily drag the
window size via stage manager. I opened my website in a private tab, and when I
was done with it, I pressed CMD-w, but it closed the whole safari window. I
thought it had just closed the private tab, so I re-opened safari, and I found
that all my other tabs had disappeared.</p>
<h2>The Panic</h2>
<p>I started panicking, I remembered that if you go into the “Show All Windows”
page, it should have a button to recover the last deleted window.
Unfortunately, I don’t know why, but it was not there…</p>
<p>I also remembered that if you hold down the plus key, it should show your
recently closed tabs. Great, it might be a bit of effort to reopen them all, but
I should still be able to recover them all, or so I thought. I held down the “+”
button, and it showed me only the list of tabs that <strong>I had manually closed</strong>…</p>
<p>I have come to accept that my 30 or so tabs that I wanted to read later are
gone, and I did not want to resort to going back to yesterday’s iCloud backup.</p>
<h2>Lessons Learned</h2>
<p>I’ll start using tab groups for everything, they seem to persist for a while.
I used to use tab groups for everything due to the same reason, but I got lazy
and started to not use tab groups… Never again.</p>]]></content>
    <link href="https://ezrizhu.com/blog/safari-rant" rel="alternate" />
  </entry>
  <entry>
    <title>How to Build Your Own ISP</title>
    <id>https://ezrizhu.com/blog/build-your-own-isp</id>
    <published>2023-07-26T00:00:00+08:00</published>
    <updated>2023-07-26T00:00:00+08:00</updated>
    <content type="html" xml:base="https://ezrizhu.com/blog/build-your-own-isp"><![CDATA[<p>This was written a while ago when I was back in high school, some information
may be outdated. If you spot any errors, please let me know and I will update
it.</p>
<p>This is also meant to be an overview of how the internet works, and how one
would setup a virtual BGP network on a linux machine. The exact commands and
configuration may vary depending on the setup.</p>
<h2>How the Internet Works</h2>
<p>When you look up something on Google, is your computer connecting to the Cloud?
Are your favorite movies and TV shows stored up high in the clouds? Well, cloud
usually means ‘someone else’s computer’. In the case of Google, cloud are
Google’s massive data centers. Your movie and TV shows are stored in physical
disks in enormous data centers that we call “cloud” today, and if you have an
iPhone with iCloud backup, your phone is backed up to servers in Apple’s data
centers.</p>
<p>But how does your device connect to other people’s computers? I’m sure you all
know it’s with the internet, but how exactly does that work? Does your Internet
Service Provider (the company that gives your home internet or your phone’s
wireless provider) have a line that goes directly from your home to Google’s
data center? Well, not quite; the cable from your home or from your 4G/5G towers
connects to your ISP’s data center. In the datacenter, they have connections to
all the other networks(i.e., other ISPs, companies, etc.) on the internet,
either directory, or indirectly via peering or internet eXchange points. I will
elaborate further on that.</p>
<p>Every connection on the internet originates from an IP address. For example,
your phone has an IP address, and your devices in your home that are connected
to the internet also have an IP address. An IP Address is like a street address.
When you connect to websites on the internet, it’s almost like sending mail to
another person’s house or a corporation’s address. You will learn more about
that later aswell.</p>
<p>So when you look up something on Google, your device sends the request from its
IP address to Google’s server at the IP address 172.253.115.113. It will go
through other devices, like your router, your ISP’s router, and Google’s
routers, until it reaches 172.253.115.113. Then Google’s server will send the
response back to your device’s IP address.</p>
<p>But how does the ISP know where 172.253.115.113 is? Does Google just have a
bunch of cables connecting its data center to other ISPs?</p>
<h2>How Your ISP Connects to The Internet</h2>
<p>Well, Google does not have a bunch of wires each going to a different network
like your ISP. That would be too many wires, too costly, and too difficult to
maintain. Instead, Google connects to Internet eXchange Points (IXP), a location
where multiple networks connect. Companies usually have connections to one or
more Tier-1 network(s)(networks that can connect to every other network on the
internet with peering agreements.)</p>
<p>A peering agreement is an agreement between two networks to connect to reach a
more extensive network. Networks of similar size usually do this to eliminate
any need for payment as it is mutually beneficial. For smaller networks
connecting to a bigger network like a Tier-1 ISP, called “transit”, and usually
incurs a cost for the smaller network receiving said “transit”. Different
networks can have their own peering policy, such as open peering, which allows
any network to peer with them. There’s also selective peering policy, where they
only allow some networks to peer with them, usually networks of similar size.
You learn learn more about internet peering on
<a href="https://en.wikipedia.org/wiki/Peering" target="_blank">Wikipedia</a>, and <a href="https://en.wikipedia.org/wiki/Internet_transit" target="_blank">internet
transit</a> aswell.</p>
<p>What makes up a network? Two things, an ASN and IP prefix(s).</p>
<p>An ASN is an identifying number (like a license plate) that network routers use
with BGP to identify each other. Most large companies, like Google (AS15169),
Amazon (AS16509), and Meta (AS32934), all own an ASN. Every time you visit a
website, your ISP sends a packet from its ASN to the website’s ISP’s ASN. More
on <a href="https://en.wikipedia.org/wiki/Autonomous_system_(Internet)" target="_blank">Wikipedia</a>.</p>
<p>An IP Address is like a street address. When you connect to websites on the
internet, it’s almost like sending mail to another person’s house or a
corporation’s address. You probably have a home IP address that comes from your
Internet Service Provider’s pool of IP addresses, which we call an IP “block” or
IP “prefix.”. You can learn more about IP Addresses on
<a href="https://en.wikipedia.org/wiki/IP_address" target="_blank">Wikipedia</a>.</p>
<p>How exactly do two networks connect? You probably can’t just wire a cable
between two routers and expect it to magically work. This is where BGP (Border
Gateway Protocol) comes in: BGP is a protocol that helps facilitate
communications between two networks to exchange routes(IP prefixes). In short,
two networks use BGP to tell each other what IP addresses can be reached via
them. You can read more about BGP on
<a href="https://en.wikipedia.org/wiki/Border_Gateway_Protocol" target="_blank">Wikipedia</a>.</p>
<h2>IPv4, IPv6, Whats The Difference</h2>
<p>There are two IP versions,
<a href="https://en.wikipedia.org/wiki/Internet_Protocol_version_4" target="_blank">IPv4</a> and
<a href="https://en.wikipedia.org/wiki/IPv6" target="_blank">IPv6</a>. IPv4 is probably what you think of
when you think about an IP address: something like “192.168.0.1”. IPv4 addresses
can range from 0.0.0.0 to 255.255.255.255, which leaves you with 4,294,967,296
possible IP addresses. As the internet became more and more popular, everyone’s
home began to have its own IP address. Unfortunately, the “over-allocation” of
addresses has resulted in a shortage of IPv4 addresses.</p>
<p>This is where IPv6 comes in: an IPv6 address has more possible combinations due
to a longer address size and the use of hexadecimal characters. Here’s an
example:</p>
<p><code>2001:678:d3c:1234:abcd:2543:45cf:2b4c</code></p>
<p>This address is clearly much longer than the previously mentioned IPv4 addresses
(i.e. 192.168.0.1) and as a result, can have many more combinations. Now, each
character can be a number (1-9) or a letter (a-f), making each character much
more meaningful than with IPv4. IPv6 addresses have so many combinations,
there’s more addresses than individual grains of sand on Earth.</p>
<p>Humans have used all of the available IPv4 addresses. According to Google,
39.48% of users connecting to Google are using IPv6 as of May 14, 2022. And as
of Jan 2011, IANA (the authority on IP addresses) has ran out of IPv4 addresses
to distribute to companies like RIPE NCC. <a href="https://en.wikipedia.org/wiki/IPv4_address_exhaustion" target="_blank">More on IPv4 exhaustion
here</a>.</p>
<h2>You can Build Your Own ISP</h2>
<p>That’s correct! You can build your own network on the internet, along with your
own AS number and IP Prefix. You can connect your devices to it and browse the
internet with your own IP addresses.</p>
<p>Why would you build your own ISP?</p>
<ul>
<li>Learning: Well, it is a great way to learn computer networking, especially if
you’re interested in getting a job in the tech field.</li>
<li>Networking: There is also a whole community of hobbyist network operators out
there, allowing you to network with other people in the field and make new
friends.</li>
<li>IPv6 Access: If your ISP does not provide IPv6, you can use your network’s
IPv6 address to browse the web with IPv6. You can also offer your friends and
family with IP addresses to use.</li>
<li>Cheaper IP Addresses: If you’re planning on running a hosting company or
something that uses a lot of IP addresses, running your network would also drive
down the costs of renting individual IP addresses from another company.</li>
</ul>
<h2>Getting an ASN and a Prefix</h2>
<p>To run your own ISP, you will need a few things, mainly internet resources from
a LIR and internet transit from a provider.</p>
<h3>An ASN and an IP Range</h3>
<p>You can get an ASN and an IP range from a LIR, below are a few LIRs.</p>
<ul>
<li><a href="https://infernocomms.com/" target="_blank">Inferno Communications</a></li>
<li><a href="https://glauca.digital/" target="_blank">Glauca Digital</a></li>
<li><a href="https://www.openfactory.net/" target="_blank">OpenFactory</a></li>
</ul>
<h3>Server Provider</h3>
<p>(Optional if you’re in the <a href="https://www.ripe.net/about-us/what-we-do/ripe-ncc-service-region" target="_blank">RIPE Service
Region</a>)</p>
<p>If you’re in the RIPE service region, you can ignore this step if you want to set
up your network from your home. But you can also set it up from a server
somewhere else like a cloud provider.  If you’re not in the RIPE service region,
you will need to have a server in the RIPE region. Below is a list of server
providers in the RIPE region that also provides transit.</p>
<ul>
<li><a href="https://www.vultr.com/pricing" target="_blank">Vultr</a></li>
<li><a href="https://vmhaus.com/plans" target="_blank">VMHaus</a></li>
</ul>
<h3>Transit Provider</h3>
<p>You will need two networks to upstream your network to access the rest of the
internet and have justification for an ASN.</p>
<p>Below are a few <strong>free</strong> transit providers that I recommend. If you live in the
RIPE service region, you can run your whole network directly from your home and
connect to two of the transit providers below.</p>
<ul>
<li><a href="https://freetransit.ch/" target="_blank">Freetransit</a></li>
<li><a href="https://bgptunnel.com/" target="_blank">BGP Tunnel</a></li>
<li><a href="https://as206628.net" target="_blank">EzriCloud</a></li>
</ul>
<h3>Setting Up BIRD on Your Server</h3>
<p>Setting up your network<br>
Before we start, let’s make sure we have everything ready.<br>
• A RIPE ASN<br>
• A RIPE IPv6 Prefix<br>
• Transit Providers (If you want to run your ISP from your home)<br>
• VPS Provider with transit (If you want to run your ISP from a server)</p>
<p>For the following tutorial I will be using Debian 11 in a Vultr VPS with Vultr
as my upstream.</p>
<p>Vultr (and some other transit providers) requires you to provide them with a LoA
(Letter of Authorization), allowing them to transit your IP Prefix and your ASN.
This can be done easily via <a href="https://loa.tools" target="_blank"><strong><em>loa.tools</em></strong></a>, plugging in
your ASN’s information and Vultr’s (AS20473) information.</p>
<p>We will use 65535 as our ASN in the following documentation and
2001:DB8:1234::/48 as our prefix.</p>
<p>After you log into the server via ssh, we need to install bird2. Bird2 is a
software that communicates with other routers using BGP. (Note: If you have
firewall enabled, please allow 179/tcp)</p>
<p><code>ufw allow 179</code>  <code>apt install bird2</code>  We will also make a dummy interface where
we will route your prefix to. (Note: If you are setting this device up as a
router at your home, replace dummy0 with your LAN interface, and you can omit
the last line with ‘pre-up’) Edit `/etc/network/interfaces` and add the
following lines</p>
<p><code>iface dummy0 inet6 static address 2001:DB8:1234::/48 pre-up ip link add dummy0 type dummy</code></p>
<p>After bird2 is installed, we will edit its configration file at
`/etc/bird/bird.conf`</p>
<pre><code class="language-text">log syslog all;

router id 0.0.0.0;
# Replace 0.0.0.0 with your VPS's public IPv4 address

protocol device {
        scan time 5;
}

protocol direct {
        interface "dummy*";
        ipv6;
}

protocol static
{
        ipv6;
        route 2001:DB8:1234::/48 via yourVMsIPv6AddressHere;
}

protocol bgp vultr {
        description "Vultr";
        local yourVMsIPv6AddressHere as 65535;
        neighbor 2001:19f0:ffff::1 as 64515;
        multihop 2;
        password "bgpPassword";
        ipv6 {
                import all;
                export filter {
                        if net = 2001:DB8:1234::/48 then accept;
                };
        };
}
</code></pre>
<p>Do <code>birdc configure</code> to apply the changes. And do <code>systemctl enable --now bird2</code>
to ensure it is started and enabled.</p>
<p>You can do <code>birdc show protocol all</code> to check the BGP session, you should see
the connection as Established.  To test using your own IPv6 address, do <code>ping -i yourOwnIPv6Address google.com</code></p>
<h2>Connect Your Local Devices to Your Network</h2>
<p>Connecting your device to your network via a VPN.</p>
<p>A VPN stands for Virtual Private Network, from Wikipedia “A virtual private
network extends a private network across a public network and enables users to
send and receive data across shared or public networks as if their computing
devices were directly connected to the private network.” In short, it allows
your device to use the network connection from your VPS.</p>
<p>We will be using the same machine from the last article.</p>
<p>First we install our VPN server, wireguard. <code>apt install wireguard</code><br>
Then we will create a public and private key pair.<br>
<code>cd /etc/wireguard wg genkey | tee privatekey | wg pubkey &gt; publickey</code><br>
This will create two files in the wireguard directory, publickey and privatekey.
Now we make a wireguard configuration at <code>/etc/wireguard/wg0.conf</code> And fill out
the configuration.</p>
<pre><code class="language-text">[Interface]
PrivateKey = privateKeyHere
Address = 2001:DB8:1234:a::/64
ListenPort = 7777 or any other port

[Peer]
PublicKey = Your device's wireguard publickey
AllowedIPs = 2001:DB8:1234:a:1::/80
</code></pre>
<p>Start and Enable that wireguard tunnel via <code>systemctl enable --now wg-quick@wg0</code>
Enable forwarding by uncommenting <code>net.ipv6.conf.all.forwarding</code> in
<code>/etc/sysctl.conf</code> and setting it to 1 and restart the server.
Also allow port 7777 on your firewall.<br>
<code>ufw allow 7777</code><br>
On your client, create a public and private key, and use the following config.</p>
<pre><code class="language-text">[Interface]
PrivateKey = ClientPrivatekey
Address = 2001:DB8:1234:a:1::/64

[Peer]
PublicKey = wireguard server's public key
AllowedIPs = ::/0
Endpoint = wireguard server public address:port
</code></pre>
<p>Start and Enable that wireguard tunnel via <code>systemctl enable --now wg-quick@wg0</code></p>
<p><strong>And there you have it, your device connected to the internet from your own
network and your own address. Congrats!</strong></p>]]></content>
    <link href="https://ezrizhu.com/blog/build-your-own-isp" rel="alternate" />
  </entry>
  <entry>
    <title>You Only Need a Tablet for Computer Science</title>
    <id>https://ezrizhu.com/blog/tablet-for-cs</id>
    <published>2023-07-25T00:00:00+08:00</published>
    <updated>2023-07-25T00:00:00+08:00</updated>
    <content type="html" xml:base="https://ezrizhu.com/blog/tablet-for-cs"><![CDATA[<p>Last May I finished the first year of my computer science degree. I was able to
get away with only carrying my iPad around campus, and being known as the kid
that uses the iPad for computer science.</p>
<h2>How I pulled it off</h2>
<p>I have an ordinary iPad Air (Fifth Gen), it runs stock iPadOS, and has the M1
chip with cellular data. I also have the Magic Keyboard and an Apple Pencil with
it. I run <a href="https://as206628.net" target="_blank">EzriCloud</a>, an infrastructure and networking
project consisting of a few colocated servers in California and New York City,
running on my own ISP. In my cluster of hypervisors, the most important machine
is my workstation virtual machine (VM). The workstation VM is a simple Debian
install with no window manager or desktop environment, and it has
<code>openssh-server</code>, <code>tmux</code>, <code>neovim</code>, and a few development tools like the Rust
and Golang toolchain, and <code>git</code> installed onto it.</p>
<p>As you may have guessed, I do practically all my work on this workstation VM. I
think I first got the idea from trying out <a href="https://coder.com/" target="_blank">Coder.com</a> a few
years ago. I started because I wanted to be able to switch seamlessly between
working on my laptop to my PC back in high school. Thanks to the power of SSH
and <code>tmux</code>, I was able to have a persistent development environment in the
“Cloud” that follows me wherever I go. All I must do was to <code>ssh</code> and <code>tmux attach -t &lt;name&gt;</code>. It was a perfect workflow for me since <code>neovim</code> is my text editor of
choice, and <code>tmux</code> fits very well into the workflow.</p>
<p><strong>Moving between devices was so smooth that I was able to map my thought
processes into <code>tmux</code> panes and windows, and then resume exactly where I picked
off without having to think about what I was doing before. This advantage
allowed me to easily switch between different projects, significantly increasing
my time to resume working on projects.</strong></p>
<p>With this setup, I was able to attend classes and programming labs around campus
with just the iPad that I was already carrying for my math notes.I was also able
to work anywhere with a cellular connection — mostly on a bus, or on a train —
without having to deal with a throttled mobile hotspot connection or search for
public WiFi.</p>
<p>Quick reminder for those that are not super familiar:</p>
<ul>
<li>SSH (Secure Shell) allows me to access my server’s command line via a secure
connection.</li>
<li>tmux (terminal multiplexer) allows me to have multiple workspaces, windows,
and split my screen. With that, I can work on multiple tasks at the same time,
with my own arrangement of “windows.” Think of it as Apple’s Stage Manager, or
<a href="bspwm" target="_blank">a tiling window manager</a>. Tmux sessions are always detached from your
SSH session, meaning if you disconnect from the server, what was on those tmux
windows will still be running in the background. With tmux, I can easily
disconnect from the server, or switch to a different window, and trust that my
commands or my editor will run uninterrupted. This is incredibly neat as
sometimes the internet connection can be spotty when I am on a train.</li>
<li>Neovim is a fork of vim, a popular terminal-based text editor. It’s a feature
packed command line based editor that allows you to navigate and edit a file
with just keyboard shortcuts. Although mouse pointer is supported if you
prefer that. Personally, I do all of my file editing with the keyboard, never
having to lift my hand off of the keyboard to reach for the trackpad or mouse.
I find the keyboard-only nature of my workflow also makes me a more efficient
programmer as neovim provides very powerful keyboard shortcuts for navigating
a file, or making bulk changes.</li>
<li>RDP and VNC are protocols to access a computer’s graphical interface, think of
it as SSH but for GUIs. Although I don’t use them much, they’re especially
useful for people that need to use graphical applications for their work on
the development machine.</li>
</ul>
<p>Now, you may be thinking: “What about graphical applications that can’t work
with SSH?” I decided to use a separate VM (to keep my main VM light), with
<code>xfce4</code> and <code>xrdp</code>, and I used Microsoft’s <a href="https://apps.apple.com/us/app/remote-desktop-mobile/id714464092" target="_blank">Remote Desktop
App</a> to connect
to it from the iPad. I tried VNC at first, but the experience was extremely
undesirable as none of the clients worked well with the servers that I had
tried. The fact that VNC only supports passwords up to eight characters also
made it not a great option for me.</p>
<p><img alt="Screenshot of the source code of this website opened with neovim and tmux on an iPad" src="/assets/img/blog/20230725-ipad-screenshot.png"></p>
<p>Back to the iPad, I use <a href="https://termius.com/" target="_blank">Termius</a> for SSH and SFTP
(transferring files over SSH) access to my server. Termius also has support for
port forwarding, cross-device syncing, and agent forwarding. One of the coolest
feature that Termius has is it’s ability to derive a ssh key from my iPad’s
<a href="https://support.apple.com/guide/security/secure-enclave-sec59b0b31ff/web" target="_blank">Secure Enclave
Processor</a>,
a physical coprocessor used for secure cryptographic functions of the iPad. I
trust this Secure Enclave due to Apple’s solid engineering on platform security,
which you can read more
<a href="https://support.apple.com/guide/security/welcome/web" target="_blank">here</a>. At the touch of
fingerprint-to-sensor, I could log into any of my servers, nearly instantly.
This is another benefit of using Apple’s Secure Enclave; The master key is
derived from your fingerprint or other biometrics, like Face ID.</p>
<p>For note taking, I use <a href="https://www.goodnotes.com/" target="_blank">GoodNotes</a>, as it was
recommended to me by many of my friends and I find it very enjoyable to use. I
have a <a href="https://www.wireguard.com/" target="_blank">wireguard</a> to tunnel me into my internal
network whenever I have to access something sensitive. I also have
<a href="https://procreate.com/" target="_blank">Procreate</a> and the <a href="https://affinity.serif.com/en-us/" target="_blank">Affinity
Suite</a> for whenever I am feeling creative. As
of recently, I have also begun using <a href="https://ia.net/writer" target="_blank">iA Writer</a> for
writing blog posts. I find iA Writer very pleasant to use, as it allows me to
focus on writing my blog posts in a way which I have never been able to before.</p>
<h2>How you can do the same</h2>
<p>You can do the same! Any tablet works — a friend that deals in systems
programming and programming languages works off of their Samsung Galaxy Tab. On
iPadOS, Termius is my top choice due to its aforementioned versatility. There
are also free VNC and RDP clients on the App Store, although I find Microsoft’s
Remote Desktop app to be the most convenient for me. On an android tablet Termux
is a very popular terminal emulator and can bring you into a Linux environment;
meanwhile on iOS, there’s iSH. Besides the traditional <code>ssh</code>,
<a href="https://mosh.org/" target="_blank">Mosh</a> is a roaming friendly ssh replacement for those that
wants a more responsive ssh session when the connection is not the best.</p>
<p>If you don’t want to work from your Linux environment on your Android tablet, or
if you are working off of an iPad, you probably need another server to work
from. Luckily companies are handing out servers like it’s nothing.</p>
<ul>
<li><a href="https://www.digitalocean.com/" target="_blank">DigitalOcean</a> was my first server provider.
They have always been extremely reliable and user friendly. They offer $200
credit for a whole year with the <a href="https://education.github.com/pack" target="_blank">Github Student Developer
Pack</a>!</li>
<li><a href="https://www.vultr.com/" target="_blank">Vultr</a> is a DigitalOcean alternative that currently
offers $250 credit for a few months. I currently use them to power parts of my
network via their BGP features.</li>
<li><a href="https://aws.amazon.com/" target="_blank">AWS</a>, <a href="https://cloud.google.com/" target="_blank">GCP</a>,
<a href="https://www.oracle.com/cloud/" target="_blank">Oracle</a> all offer low-spec free tier servers.</li>
<li>Tons of other server providers offer decent compute servers at competitive
prices, like <a href="https://www.hetzner.com" target="_blank">Hetzner Cloud</a> and
<a href="https://www.scaleway.com/en/" target="_blank">Scaleway</a>.</li>
</ul>
<p>If you need to do any hardware emulation, <a href="https://www.qemu.org/" target="_blank">QEMU</a> is great
for that purpose.</p>
<p>During last year, I helped another classmate setup this environment on his iPad
alongside a server from my network. He was able to also learn Linux at the same
time, and never looked back!</p>
<p>I have affiliate links with DigitalOcean and Vultr for some free credits if you
don’t have the Github Students Pack, feel free to reach out if you’re
interested.</p>
<p>Next year, check back in and see how I am going with just a Steam Deck!</p>
<p><img alt="A picture of a Steam Deck with neovim opened on a racket file" src="/assets/img/blog/20230725-steamdeck.jpg"></p>
<p><em>This article was edited by <a href="https://jackdor.land/" target="_blank">Jack Dorland</a>. Thank you!</em></p>
<p>Update (Aug 2023): I have been getting into public unix systems (pubnix),
they’re public unix (usually Linux or BSD) servers, that allow people to get a
user account and do stuff on it. Most have developer toolchains on it that allow
people to program and run their code. If you don’t want to get your own server
to do development work on, or if you want to just try things out, they are a
great choice!</p>
<p>Pubnixes also offer other command-line based utilities, like irc clients, email
clients, and some other retro internet tools. You can find a list of pubnixes
below.</p>
<ul>
<li><a href="https://tildeverse.org" target="_blank">Tildeverse</a></li>
<li><a href="https://sdf.org" target="_blank">SDF Public Access Unix System</a></li>
</ul>
<p>Update (Jan 2024): After posting on
<a href="https://lobste.rs/s/s5q1vb/you_might_only_need_tablet_server_for" target="_blank">lobste.rs</a>
someone wrote a <a href="https://snats.xyz/pages/articles/all_you_need_is_a_microcontroller.html" target="_blank">blog post on doing it with just a microcontroller via
telnet!</a>.
It was a really good read, I highly recommend it if you found this interesting!</p>]]></content>
    <link href="https://ezrizhu.com/blog/tablet-for-cs" rel="alternate" />
  </entry>
  <entry>
    <title>How This Website Is Overengineered</title>
    <id>https://ezrizhu.com/blog/this-blog</id>
    <published>2023-07-23T00:00:00+08:00</published>
    <updated>2023-07-23T00:00:00+08:00</updated>
    <content type="html" xml:base="https://ezrizhu.com/blog/this-blog"><![CDATA[<p>This website took heavy inspiration from <a href="https://xeiaso.net/talks/how-my-website-works" target="_blank">Xe’s
blog</a>. I strongly encourage you
to check that out as Xe did a great talk on it!</p>
<p>I just want to state this here first, the reason why I made my website like this
is that I wanted to learn Rust, and wanted to give myself the ability to add
more dynamic elements to it in the future without using javascript. There are
much easier, better documented, less time consuming ways to do this via a static
site generator. There are a lot of static site generators out there, there
probably is one written in your favorite programming language. I highly
recommend using a static site generator if you wish to host a blog.</p>
<h2>Rust</h2>
<p>The content parts of my website, like the news list, project pages, blog,
contact info, and the short bio on the homepage, are all written in markdown
documents. My website, on startup, then reads all the markdown files, parses
them into html, and then places them into a <a href="https://doc.rust-lang.org/book/ch08-01-vectors.html" target="_blank">Rust
<code>Vec</code></a>. When the user
request a webpage, the website fetches the content from the <code>Vec</code>, and then
plugs them into the webpage template, then sends them off towards the web
client.</p>
<p>I use <code>tokio</code> for my async runtime <em>only because</em> it is well-documented and
beginner-friendly. The same folks behind <code>tokio</code> also created <code>axum</code>, the web
framework used for this project. This website is also my first Rust project. I
forced myself to write it in Rust because I needed to motivate myself to learn
Rust, and I think it went pretty well in the end. I learned a lot about Rust
programs, the borrow checker that I both love and hate, and its error handling
that I still don’t know whether I like or not (over, say, Golang’s <code>Error</code> type)
But overall it was a fun experience writing this website, and the infrastructure
behind it, as described later.</p>
<h2>Dynamic CSS Fetching</h2>
<p>My website’s CSS isn’t all that complicated. I focused on using the Nord color
scheme for my website (as it’s become somewhat of a personal color scheme at
this point) and simply wrote the remaining CSS by hand. The responsitivity and
the navigation bar uses Yahoo’s <a href="https://purecss.io" target="_blank"><code>pure-css</code> and its responsive
grids</a>.</p>
<p>Pages on this site load two stylesheets: the common (shared) stylesheet, as well
as its page-specific stylesheet. The shared stylesheet and the page-specific
stylesheet are consisted of multiple stylesheets on the backend that are
combined at compiletime. Similarly to the website content, on startup, my
website does the following:</p>
<ol>
<li>reads all relevant stylesheets</li>
<li>minifies the stylesheet via the <code>minifier</code> crate</li>
<li>(and on requests) concatenates the relevant CSS files together and sends them
to the client.</li>
</ol>
<p>Earlier in development, the backend would concatenate ALL relevant stylesheets
(both page-specific and shared) into a single stylesheet to be sent to the
client. This caused the web browser to not cache the background, and every time
when I navigate to a different page, the background flashes white for a second
as it needs to refetch the stylesheets. Now with the dual-file arrangement and
cache control, I am able to save (admittidely, a very little amount of)
bandwidth while still preventing my website from flashbanging me on every
reload.</p>
<h2>Infrastructure</h2>
<p>I own and operate my own infrastructure, hardware and IP block which hosts the
backend. I could use a third party CDN to make load times faster, especially in
non-U.S. regions, which would have the added benefit of higher reliability.
However, I’d rather my website be 100% under my control, and the small latency
is really negligible since the website is already lightweight. I hope that some
day I’ll run a global anycasted CDN, and move my website over. But until then,
my website will live on EzriCloud, California.</p>
<h2>Deployment</h2>
<p>This blog, currently, is deployed by two docker containers, and there is one
[watchtower] instance controlling each docker container. <code>watchtower</code> is
configured in API mode, waiting for webhook requests to update its respective
docker container.</p>
<p>The two docker containers are reverse proxied by Nginx, with load balancing and
failover. This simple setup ensures that load is distributed between the two
docker containers. Most importantly, if one container crashed or is being
updated, the other one can handle the requests.</p>
<p>Upon pushing to the <code>main</code> branch, Github Actions will do the following steps:</p>
<ol>
<li>Build the docker container for the website.</li>
<li>Send a webhook to <code>wt0</code> (watchtower instance #1), triggering the first
instance of the container to upgrade.</li>
<li>Check, via <code>curl</code>, the <code>X-Server-Select</code> header and <code>grep</code> to see if the
website is updated on the first container (<code>www0</code>), checking whether the hash
in the footer of the website matches the commit hash of the current CI build.
<em>If any of these steps fail, the pipeline will stop immediately.</em> Step 2 and
3 is then repeated for the second website instance. Lastly, Github Actions
will ping Google with the updated sitemap of the recently-deployed website.</li>
</ol>
<p><img alt="A graph describing my website backend" src="/assets/img/blog/20230723-deployment.png"></p>
<h2>The Future</h2>
<p>As of this blog post, I hope to explore:</p>
<ol>
<li>Adding webmention support for the blog</li>
<li>Adding something to track pageviews, exposing to Prometheus</li>
<li>and a Prometheus exporter that I can then integrate into Grafana, pulling
pageviews from both containers</li>
<li>HTML/CSS validation &amp; Markdown linting</li>
<li>More tests</li>
</ol>
<p>Though I want to add more dynamic elements to this website, perhaps a comment
section, I’m not sure… It’s hard to balance maintaining a professional feel and
adding fun features like live Discord/Spotify activity integration.</p>
<p><em>This blog post was edited by <a href="https://jackdor.land" target="_blank">Jack Dorland</a>. Thank you!</em></p>]]></content>
    <link href="https://ezrizhu.com/blog/this-blog" rel="alternate" />
  </entry>
  <entry>
    <title>Hello World!</title>
    <id>https://ezrizhu.com/blog/hello-world</id>
    <published>2023-07-19T00:00:00+08:00</published>
    <updated>2023-07-19T00:00:00+08:00</updated>
    <content type="html" xml:base="https://ezrizhu.com/blog/hello-world"><![CDATA[<p>This is the third revision of my website. My first website was a templated
website from <a href="https://html5up.net/photon" target="_blank">html5up</a>. My second website was a
simple one-pager with my name, a line about what I do, and a few social links.
This website, hopefully the last revision, will do <em>a lot</em> more.</p>
<p>Presently, I have a homepage with an introductory “about-me” paragraph, recent
news regarding my accomplishments and personal endeavors, a page for my
projects, social links, and this blog. I think that’s a fairly acceptable
design, although it may be a little cramped due to the amount of text. Perhaps
I’ll revise the design later. Currently, I am thinking of publishing a blog
article either weekly or biweekly (once every two weeks.)</p>
<p>For my blog, I am thinking of mostly writing tech-related things that I
encounter as I wander further down the path of computer science. I don’t want
to limit it to solely computer science, though. I too, have hobbies outside of
programming, and I’d love to use this blog as a space to share my love for my
non-computer related hobbies as well as my technological ones. My motivation
for this blog is to mainly document what I know and encourage myself to think
things through more. I also think it’s time for me to have a broader presence
on the internet and start contributing back with my blog and open-source
projects.</p>
<p>As I’m still trying to improve my English writing skills, I hope this website
becomes a valuable and interesting resource for those interested in my thoughts
and hobbies. If you have any questions, or would just like to share something
with me, you can reach out to me through <a href="/contact" target="_blank">a myriad of different contact
methods.</a> 📨</p>]]></content>
    <link href="https://ezrizhu.com/blog/hello-world" rel="alternate" />
  </entry>
</feed>